Awhile ago we started a new unit in class. The unit is about Shakespeare’s play Julius Caesar. To get to know the characters better, we did a small project in class where we had to create a large paper cut out of our assigned character and put a bunch of images and a few words to represent major events in the Roman’s life. We were split into groups of about 5 people and my group was assigned Marcus Brutus.
His life was very…interesting, to say the least. He was born on June 85 BC and a little while after his father died and he was adopted by his uncle. When he was older he got very involved with politics and became an emperor. Brutus had joined the conspiracy against Caesar and took part in the assassination of his friend. Marcus Brutus was involved in two war engagements where he battled against two forces. Brutus won the first engagement but had been defeated in the second. He retreated from the battle and not long after decided to commit suicide. Here’s our group’s recreation of Marcus Brutus:
My Star Wars Blue Sky Project
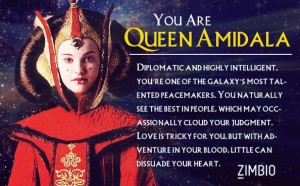
A few weeks ago, we were assigned a new Star Wars project. We each had to answer a driving question for our projects. My question was: “How do the designs and colours on a costume signify the character’s status?” I planned on doing a lot of research regarding colours, designs, fabrics, etc to help answer most of my question. After doing all my research, I planned on making Queen Amidala’s headdress as an example and I would explain how her headpiece added to her role as Queen Amidala.
As for the process, I planned on finishing and taking notes of all my research in the first week, in the second week, I wanted to have all my resources and I wanted to have finished my plan to make her headdress, and in the third week my goal was to have finished my project. I followed this schedule outline pretty well other than when the headpiece had broken and I needed much more tape to put it back together again.
Here’s my planning chart: Star Wars Blue sky form 2015
Here’s the information I’ve summed up about Queen Amidala’s regal gown and headdress:
Queen Amidala’s regal gown consisted of mostly red, to signify power, strength, and determination. Being a queen, she needed to express her commitment to maintaining Naboo’s cultural history, and her role within it. Queen Amidala wore a golden headpiece, which had the well known Jewel of Zenda, and had her hair combed over a padded form. This exceptionally bold yet formal appearance disguises her young age, expressing an air of confidence beneath white makeup. Queen Amidala had worn her regal gown during her coronation and once again right before the invasion when she met Nute Gunray via holographic transmission.
What I learned from doing this project:
I learned a more about how simple things such as colours and designs can make a bigger influence on us than we thought and I also learned so much more about the costumes that not only Padmé Amidala wore but what the other characters wore too.
Driving Question: How do the designs and colours on a costume signify the character’s status?
My answer to my driving question: Using colours such as black, red, or other dark,bold or intense colours could represent evil while brighter shades such as white could represent hope. You could also add on extra accessories such as capes, crowns, etc to make it more clear what type of role the character is playing.
And now, I become pun with the force.
Q: Which program do Jedi use to open PDF files?
A: Adobe Wan Kenobi
Star Wars episode 2: Bar Wars
Luke and Obi-Wan walk into a Chinese restaurant. Ten minutes into the meal, Luke’s still having trouble with the chopsticks, dropping food everywhere. Obi-Wan finally snaps, “Use the forks, Luke.”
Episode III: If Darth Vader’s Final Words Were Dad Jokes
“Luke… I’m reading a great book about Force levitation… I can’t put it down.”
I hope you enjoyed those corny Star Wars jokes. See you next time!
Sew Much Fabric… Sew Little Time
 I should really stop these sewing jokes, I’m running out of material.
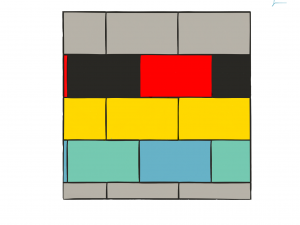
Recently, my class has been working towards making and designing our very own quilt squares. We were split up into groups of four or five people to make our quilts. In my group, we decided to use an abstract style to represent our assigned parts of our heroes’ journey. My quilt represents the end of our heroes’ journey. In the end of our story, the people who were saved by Juno built a statue of him in honour of his bravery. The islanders also named the island after Juno and over time built a big and healthy civilization on the island.
I designed my quilt to look like a brick wall to signify how the civilization supports itself and how it used that support to get bigger and better over time. I coloured the top and bottom layers of bricks gray to represent the cities, the pavement, and roads. Near the middle of my quilt square I coloured it black and red to represent the memory of both Juno’s death and bravery. I coloured the brick layer in the middle gold to represent the statue that the people built of Juno in honour of his strength. In the final brick layer which is just above the golden layer is a layer of green and blue used to represent the good people of Juno’s island.
I found this project to be very enjoyable as well as a great learning opportunity for me to learn to sew. I look forward to more interesting projects.
Here’s a whole bunch of links from my group for the other parts of Juno’s journey:
Part 1: Calum’s Part: http://www.blog44.ca/calumo/
One day there was a young man named Juno, he didn’t have very many friends or family, although, everybody knew him. His mother had died when he was young, and his father abandoned him, so he was very lonely. Every morning he would get up and do the same thing over and over again, but this day was different, because as he was sipping his morning cup of coffee he heard cries for help just outside his house. He courageously ran out and saw people running and heard and saw gun fire.
Part 2: Mimi’s Part: http://www.blog44.ca/mimiz/
He grabbed as many people as he could and ran to the nearby forest they ran for miles until everybody was out of breath by now it was getting dark and everybody was getting very tired so they decided to go to sleep. The next day everybody decided that they would go around the coast instead of back through the village, everybody thought that was the safest way. They walked for days on end and many people were very wounded, so they slowly died as they were walking. Finally they got to the village after surviving off of berries and water from the streams, everybody was famished so they ran to the nearest shop but something was wrong, nobody was out on the streets.
Part 3: Quinn’s Part: http://www.blog44.ca/quinnh/
Quinn’s part: Finally they got to the village after surviving off of berries and water from the streams everybody was famished so they ran to the nearest shop but something was wrong, nobody was out on the streets. they then decided to take a boat off to another island (which was their original plan) as they were leaving the dock they heard cries for help Juno jumped out of the boat and pointed the lady to the direction of the boat and just as she got in there was a person with a gun shooting at the boat so they quickly steered away nobody was hurt until they realized Juno was bleeding.
Part 4: Aiden’s Part: http://www.blog44.ca/aidens/
After boating for a few days Juno begun to slowly become weaker from the infected wound and eventually died.
I’m a Sewaholic! (…Not really)
Hello, and welcome back to my blog! Today I’ll be telling you a little about my quilt for a group project we started not too long ago. The most sewing I’ve ever done is probably helping my mom sew ripped sweaters and what not which made this project a great learning opportunity!
Within my group, I was assigned the job to design and make an abstract quilt to represent the ending of our heroes ‘ journey. The four other group members had to design and make an abstract quilt that represents a different part of the story that they chose.
A few difficulties I had during the quilting process included quilting on the blank side after I’ve flipped the quilt over because I had no guide to where I was supposed to sew.
I think this group project was a great learning experience for me because I got to learn how to sew and quilt.
I’m a Queen!!
Reflecting On My Advertisements
A little while ago, my class did a unit on advertising. We were assigned a project where we had to make three advertisements. One of them was a business ad which we made an ad for a business. The second one was our advocacy ad which was an ad to help out the environment. The third was a natural landscape ad where we had to make an ad which would convince people to visit a scenery. By using multiple apps to ad text, edit our pictures, and make the layout of our ads we were able to complete all three of our advertisements.
Editing
When editing the pictures I changed the brightness, cropped the pictures, added filters, and I enhanced the pictures to brighten them and adjust the contact levels. When editing the poster, I changed the font of the text, the size of the text, and I tested different layouts to see which one would fit the image I had of my ad in my head. The apps I used to make and edit my ads and pictures include Snapseed by Google, Canva by Canva, Repix by Sumoing Ltd, Polarr Photo Editor by Polarr Inc, and Phoster by Bucket Labs, Comic Life 3 by Plasq LLC, and Photo Editor- by Axiem Systems.
Critique
While doing our ads we would improve it ourselves, but we would also get a lot of helpful and kind critique from our peers. I liked having the opportunity to get critique from others because I could get to know the style of ads they liked and I liked knowing their opinions on my choice of colour, font, text, and layout.
Changes
If I were to do anything differently next time it would be to get much more critique from my peers. I feel that with just some more critique from different people could help a lot with my ads and not only would I be satisfied with my advertisements, but others could definitely like them too.

