We just finished wrapping up our memes project, and this is my final reflection post. This post is going to be about the memes we created to show the history of colonialism and the role nationalism played. I wrote another post about the Tik Tok memes we made, and how they incorporated into our main project, so you should check that post out as well. Both parts of the project started out the same however, with us learning about memes and nationalism. We learned that nationalism is the identity and behaviour of a nation, and that it had lots of consequences in the past and the real world. This was important for our project, because the historical event we were focusing on was the colonization of Africa, which historically was affected a lot by nationalism. We learned a lot about some of the events that happened, and the role nationalism played. I think a general example of nationalism during the colonization of Africa was the racism that took place. Lots of the Europeans doing the colonization looked down on the Africans because they were different than them, which is pretty nationalistic. But that’s just one example of the many ways nationalism was involved in the colonization of Africa, and you might say that nationalism caused it in the first place. After we learned about nationalism and the colonization of Africa, the memes part of the project came into play. We started off by learning about memes themselves, as well as Richard Dawkins theory which I explain in my other post, and simply put we learned that memes are ideas that spread from person to person. Then we started to connect memes to what we had learned previously about nationalism and colonialism, and it was now that we started to answer the driving question: “How can we use current memes to comment on the significance and consequences of nationalism around the world?” We would answer the driving question by making some memes ourselves, except this time around they would be strictly about the colonization of Africa and nationalism. We quickly got to work in making our memes, and we started out by making some ideas. Here are some of my ideas for memes:
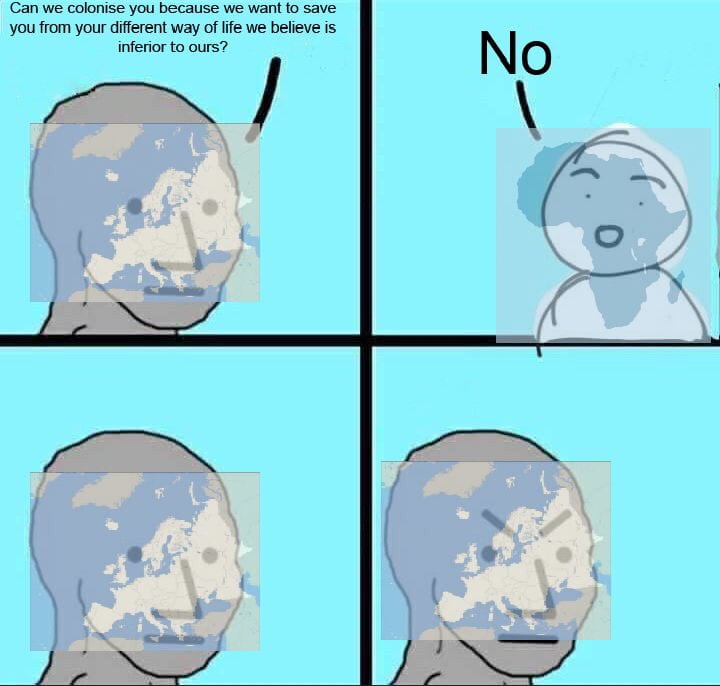
After adjusting some of my ideas, I actually got around to creating my memes, and here they are:
I’m not going to explain them, because it’s not a good meme if you have to have someone tell you what it means, but I think these memes answer the driving question, and show how memes are more than just funny internet jokes. Before this project, that’s what I thought memes where, and I barely knew anything about nationalism. Now I know the significance of memes and nationalism in history as well as today, and how they both affect our worldview. That’s about it for this post, so thanks for reading!
Recently, we started a new project that was all about memes and nationalism, with the driving question of “How can we use current memes to comment on the significance and consequences of nationalism around the world?” But before we started to try to answer the driving question, we had to learn what memes and nationalism really are, and we started off learning about nationalism. It gets kind of complicated, but the basic definition of nationalism is the identity or behaviour of a nation. Next we learned about memes, and you may know memes as this:
Or this: And these are memes, but they don’t have to be funny internet pictures. Memes at their simplest are just ideas spread from mind to mind. We also learned about some of Richard Dawkins’s ideas about memes. Richard Dawkins came up with the idea that the selfish gene and laws of Darwinian evolution apply to information and culture. He thought that ideas could spread, reproduce, evolve, mutate, and die. If you think about it, this is what is happening with the internet memes you see online, they spread as more people see them, people make more of them, they mutate into different memes, and once the meme becomes irrelevant and nobody uses it or finds it funny anymore it dies. To show this, we had to make some memes of our own, and we used an app called Tik Tok to do it. If you haven’t heard of Tik Tok before, it’s basically a social media platform for sharing short videos, and it’s popularity has skyrocketed in the past couple years. Lots of the videos are dances, trends, and as with any social media platform, memes. This project was the first time I used Tik Tok, so if you want to find out more about it I found this informative video:
The memes we were making were supposed to replicate memes or dance trends on Tik Tok, and we could make them in groups, so I ended up working with Noah and Thomas. We had to make three memes, and the first one we decided to do was the Canada check meme. This meme is about Canadian stereotypes, and we tried to put as many stereotypes in as we could.
Hi, welcome to my Mpol, where I’m going to be reflecting on my learning so far, and answering the driving question, What is your learning goal that you want to reach by the end of this school year, and how will you meet it? I’m going to be answering at the end of the mPOL, after I’ve gone through examples in all of my classes, starting off with humanities, because I think it has some great examples of what I did well and what I can improve on. One assignment I think I did pretty well on was the Revolution videos, because it showed how I worked hard to support the team, and how did my part of the project, which was to write and help film and act in our videos. But even though the videos turned out pretty well there were also some things I would have liked to change. Even though I did everything I was expected to, I didn’t really go beyond, mostly due to my use of time. Like on lots of my other assignments I kind of left it to the last minute, and then I didn’t really have time to do anything extra for my team. This goes for lots of my other assignments as well, where I would always get distracted and end up leaving it for the last minute, and lots of my work suffered for it because I would do everything within a couple hours or less.
Moving on to Maker, I think something that I did pretty well in was the student blogging challenge. I heard that lots of other students didn’t really put much into their posts on it, and didn’t really care. I treated it like a big project, and I always tried my best on my posts, but like in humanities, I got distracted at times and sometimes left posts to the last minute, and several were late, because although I wanted to do a good job, I didn’t give myself enough time to do what I wanted within the due date, and this was the case with a lot of other assignments as well.
In Scimatics my example is my chemistry stories video, which I think I did a good job on, but not a great job, because I also left this to the last second, so I didn’t have any time to really go beyond the requirements. I did it so late because I was using class time to catch up on other assignments that I had also left until the last second. I think I’ve gotten better at using my class time more productively, but I still have some improvement to do.
And finally for PGP, I’m actually using this mPOL as my example, because look at it, it’s not that bad, but it’s nothing special either. But I also put this assignment off to the last second, and pretty much everything you see written here was done in 30 minutes. That’s why I don’t have links in my post, I forgot about them, oops, but I really tried in those 30 minutes I had, and the end result was surprisingly good for the tiny amount of time it was done in, but it’s still not that good.
Before winter break we had our PLP Winter Exhibition, and this is my reflection on it. The Winter Exhibition is where we show off what we’ve learned to our parents and visitors alike. Every year the exhibition has a different theme, and this year the exhibition’s theme was Star Wars. Now, doing stuff related to Star Wars may sound fun, but there was a lot of work we did for the exhibition, and we started out by learning about the story of Star Wars itself. We started out learning about the story spine, which is the order of events of any story. We also learned about the hero’s journey, which shows the journey the protagonist takes in the story, and this isn’t only in Star Wars, it’s in Harry Potter, The Lord of the Rings, and pretty much every story you could think of. By this point you may be wondering, what does all this stuff about story spines and heroes journeys have to do with the exhibition? Well, we were actually going to be writing our very own Star Wars short story, but we weren’t going to do it alone. Last exhibition we were put into exhibition groups, but this year our exhibition group members would each be writing a section of the story, and my group members where Jude, Alex, Malaika, Anders, Gabe, and Emily. Each group got a different Star Wars location to theme their story and actual exhibition area after, and my group got the Death Star as our Star Wars location, and the library as the place where we would actually present. We began brainstorming ideas for our story and exhibit right away, and we also started reading short stories to help us understand the different elements each of us would need to include in our part of the story, like setting, mood, point of view, and more. We practiced identifying all of these elements within the short stories we read, and wrote them down on a chart, which was pretty helpful for me personally, because it gave me examples of story elements to refer to whenever I got confused or stuck with my own story, which we had started working on around the same time. The story my group had decided on was about an Imperial officer working on the Death Star, and I was doing the exposition. Our group exchanged feedback on each other’s sections of the story, and the whole group and I had a lot to revise. Not long after the first session of feedback we had already finished our second drafts, but this time we got feedback from other groups instead. Again, a lot to fix, and after revisions, we got one last bit of feedback from our teacher. After making final revisions, I finished the exposition to our story, which you can read below.
Even though our story was done, my group was still far from finished, because we had the actual exhibition coming up. We still had to plan what the library would look like for the exhibition, and we had to work on what we were presenting for the exhibition. Yes, we were showing off our stories at the exhibition, but we also had to make an artifact which expressed our section of the story. I decided I wanted to make the letter the protagonist receives when he is invited onboard the Death Star, complete with the imperial seal. To help us make our artifacts, we used the LAUNCH process, which we recorded in a journal in six phases. This video explains the artifact I created, as well as phases of the LAUNCH journal which helped me create my artifact:
After we had finished the LAUNCH journal, our artifact, and our short story, the exhibition was already upon us! My group had already planned the room design, and after we set it all up it really did look like the Death Star. I would be at the front desk of the library dressed as a stormtrooper and greeting the guests, while also showing my artifact and telling them where to check out my fellow group members exhibits, which was fitting because I wrote the introduction in our story. I had a great time, and here is some of the photos I got at the exhibition. Overall, I had a great time at the exhibition and would say it has been my favourite one yet, and I was also really pleased with how my artifact and my story turned out, and to top it all off we got to see the Rise of Skywalker in the theatre the day after the exhibition! Well, that’s about it for this blog post, remember to stay tuned for more!
Today I’m going to be doing something a little different than my usual posts, and I’m going to be reviewing the Star Wars TV show The Mandalorian, more specifically the episode “Chapter 6: The Prisoner”. There are going to be no spoilers for the episode in this post, so feel free to read it even if you plan to watch the episode sometime, or maybe this post will even inspire you to check it out! Now, let’s get right into the review. First off, this is a stand alone episode, and it has nothing to do with the main story the show has set up before, and the only returning characters are Mando himself and baby Yoda.
This may be considered an annoyance to some, as maybe they don’t like “filler” episodes, but I personally think it is well done enough to give a pass. It has a solid story, with an exposition, a rising action, a climax, a falling action, and a resolution. Since it has a full, resolution, we probably won’t expect anything from this episode to have anything to do with later episodes. The episode, as with every other episode in the show, is visually pleasing, and you can see that a lot of time and effort was put into the costumes and set, as well as the special effects which also look great. The episode kind of has a cliched plot, but deviates enough that it feels like a unique experience. A few of the new characters are cliched as well, but to a more noticeable extent, which is one of the things I don’t like about this episode. I think the episode builds up tension very well, which is backed up by the fact that there is a ticking clock, but the episode builds up tension so well in the exposition and rising action that I don’t think they even needed it. The action scenes are beautifully done, and are one of the highlights of the episode, but that’s kind of expected from a show like this. My absolute favourite part of this episode, however, is the way it toys around with the theme. It starts out as, and for most of the episode is a TV action show. A bit later in the episode, it starts to toy around with a horror theme, which is really well done, and ends with some bleak humour which breaks up the tension.
So overall, although parts of the episode are a bit too cliched, and the episode isn’t really related to the main story of the show, some stunning visual effects and action as well as the excellently done changes in theme make me give this episode a 8/10, and I would definitely recommend watching it and the rest of the show if you have Disney plus or plan on getting it.
Recently we had another small project, and this was another one that had to do with making videos, which has been a trend lately. This project was called live event, where we basically had to document an event, which could be anything from a soccer game to a basketball practice. Before we actually started in the live event, however, we downloaded the book Everyone Can Create video, and read through some of the strategies we could use to film the event.
After we had thought of some things we might do for our live event, we created an action plan, which had information like where we were going, what shots we wanted to take, and interview questions. For my live event I decided to record one of my hockey games, but there were a few issues with getting the footage I wanted. The main issue was that I would be playing the hockey game, so I couldn’t film any of it. I fixed this issue by getting my mom to film for me, because she was going to be at the hockey game anyways. However, this raised a problem of its own, because she had no idea how to film anything on an iPad. To fix this new issue, I found a video that would show her how to record in any way she wanted, so that I could play the game and still get the footage I needed at the same time. I think this is a good example of how I used the Empowered Learner competency, because I leveraged technology to help me make and demonstrate my competency in my video, which was our learning goal. The second more minor problem I had was that for my interview, Ryan, the person I was interviewing, had to go right after the game, so he might have not been able to do the interview. This shows how I used the Navigate Ideas competency, because I took a risk with the interview, and also added to others ideas in ways that enhanced them, because Ryan had to do an interview himself, and he took inspiration from some of my questions, and asked me questions with some of my ideas in them. After actually filming the game and interview, I had to edit together my video, which actually didn’t raise that many problems, but I used the Creative Communicator competency because I communicated clearly and expressed myself creatively for a variety of purposes using the platforms, tools, styles, formats and digital media appropriate for my goal with my final video. Speaking of my final video, here it is now:
So, in conclusion, I think my live event video is a success, because it has all the different video strategies we were supposed to include, and it also shows how I used the core competencies. That’s about it for this post, thanks for reading, and stay tuned for more posts coming soon!
We just finished our most recent project for Scimatics, Chemistry Stories, and now it’s time to reflect! This project was about atoms, ions, and a bunch of other complicated stuff. We started out small, with introductions to what they were and worksheets that got progressively harder as we learned more. We did an experiment which involved a cool explosion, and for the end of the project we had to make an animated video explaining the concepts we had learned, like ionic bonds, covalent compounds, and Bohr models to name a few. After we finished the storyboard we made the video itself in an app called Explain Everything, but I used IMovie to record the audio because Explain Everything is a little buggy, especially with audio. But I still managed to get past that issue, and here is my video:
After this was done, we still had a few things left. We did a quiz on what we had learned, and then a test shortly after. The very last thing we did was fill out the answers to the questions we had wrote down at the beginning of the project in our project start mind map, so here is my project end mind map:
Now that we’ve discussed what happened during the project, I can reflect on the core competencies and the big idea. The first thing I will reflect on is the big idea. The big idea was “the electron arrangement of atoms impacts their chemical nature”. After everything I’ve learned, I now understand this, and now that the electron arrangement of atoms does impact their chemical nature, because the number of electrons is a huge factor in bonding, and the whole point of bonding is to try to achieve a full valence shell, which is literally just the most stable electron arrangement, so the arrangement of the electrons pretty much causes bonding itself. Now that we’ve covered the big idea, onto the competencies.
The first competency is Communicating: formulate physical or mental theoretical models to describe a phenomenon. I showed this competency when I created the Bohr models in my video to describe atoms and ionic and covalent bonds.
The next competency is Processing and analyzing: construct, analyze and interpret models and/or diagrams. I showed this competency a lot in the video I made, because I constructed a lot of Bohr models, and I had to analyze and interpret them on some of our worksheets and our final test.
The final competency is Questioning and predicting: demonstrate a sustained intellectual curiosity about a scientific topic or problem or personal interest. I think I did alright in this competency, which is shown through my use of class time, because although I wasn’t the most efficient at the beginning of this project, by the end I had used my class time efficiently enough to complete my video, and do a good job on it as well.
In conclusion, I learned a lot from this project, because although I had limited knowledge of the subject before, by the end of the project I knew all about atoms and ions, covalent and ionic bonds, polyatomic ions, protons, neutrons, and electrons, and more, as well as showing my proficiency in the core competencies and understanding of the big idea.
This is the final post for the Student Blogging challenge, and I know it’s a bit late, but we’re going to finish the challenge anyways. There were only two tasks for this post. For the first task I decided to do the first option and reflect on the challenge as a whole, which is what I’m going to be doing for most of this post. I participated in all 8 weeks of the challenge, and wrote all eight posts, so I have a lot to think about in reflection. First off, I received five comments, which was pretty surprising because it was more than I got when I did the challenge last year. This year all of them were on different posts, while last year I had two on a post at most. I also commented on several other blogs, trying to give them constructive feedback. Here is an example of what my comments looked like:
Now, comments are a big part of the challenge, but the main focus of the Blogging Challenge is the posts. Like I said before, there were eight posts including this one, but a one really stood out for me when I was writing them. This one might make the least sense as to why it’s my favourite Blogging Challenge post, as I can just do it anytime, but the free choice week was actually my favourite post for the whole challenge. The reason for this is because while most of the posts were fun to write, we were restricted to a few different tasks. I think the Blogging Challenge would be even better if we could do whatever, as long as it is related to the theme of the week (examples: holidays or events, emojis, music). For the next and final task, I’m going to be talking about my plans for my blog. This isn’t going to be my final blog post or anything like that, I still plan to continue showing my learning journey through my blog, although I won’t have any posts on winter break, with the exception of a scimatics post and a post on the winter exhibition, but when school starts again I should have new posts out every couple weeks. That’s about it for my final post for the Student Blogging Challenge, thanks for reading even though this post was a bit late, and make sure to keep an eye out for that scimatics post and the post on the winter exhibition!
This term is almost over, and there has been a lot of stuff we’ve done, especially in Maker class. That’s why I’m reflecting on all the videos we’ve done in Maker so far, which there are ten of! I’m also going to be reflecting on the core competencies throughout this post, and I’ll be providing evidence as to how I think I did. But, let’s start out with the videos themselves! The first video we did this term was the 4 shot film. This video was a bit of a refresher for me, as I hadn’t made any videos for a long time, and was starting to get a little rusty. For this video were put into a group, and told we could make a video about anything we wanted, but it had to only use four different camera angles. My group decided we wanted to do a creepy video, although I’ll let you decide if that was actually the case. There is also kind of a comedic element to it, but you’ll have to watch the video to find out what it is.
The main challenge of this video was getting the room set up, as it had to be dark, which only really involved turning off the lights, but we also had to have no background noise, which took a bit to actually get. Overall, I think this video turned out how we imagined, and was pretty nice for only four shots. Moving on to the next video, this one was called the ghost town video. It was actually the first video we did on our Alberta trip, and took place in the ghost town in three valley gap. We were put into groups, and I was put with Thomas, Malaika, and Meg. Obviously we had to do a film about the Wild West, as there were saloons, banks, everything! However, this video could have no audio in it other than music. And with the four shot film, all we wrote out was our basic idea, but with this video we had to do a screenplay and a storyboard. One of the main challenges of this video was the time restraint. We only had so much time in the ghost town, so we had to film every scene fast. Despite this, we still got every shot we needed, and here is the final video:
In my opinion, the video was pretty good, and went exactly how we planned it to (which is a good thing). This video helped re-educate me on the planning that comes before the video, and it all paid off in the end. The video was entertaining, silent, and a success. The next video we did was also from our Alberta trip, and it was all about Drumheller. If you don’t know about Drumheller, it’s a part of the badlands in Alberta we’re they have found tons of dinosaur bones. They have a museum there as well, and that was the topic of our video, a two minute documentary on some of the things in the museum. The first part was about us discussing one of the exhibits, and the second was an interview with someone about the museum, Drumheller, and dinosaurs. Same as the last video, time was a huge problem in this video, which is why the video maybe isn’t as good as what I would have liked it to be, but regardless, here’s the video:
Like I said, the quality isn’t the best, but we were under a time limit, and I think this video helped teach me how to come up wth ideas and execute them quickly. The next video was the final video we did in Alberta, and it was much bigger than the previous two. The Alberta people video was a project in of itself, and the culmination of our efforts in Alberta. It deserves its own blog post, which is why it has one! You should definitely read the blog post, as it gives a really detailed explanation, but if you want a shortened version, I’ll explain it again now. Basically, we had to make a video that shows how a certain group of people have changed over time. The group of people I did was the First Nations, and there were a lot of things required in this video. I started out by having to do a bunch of research, and then had to get an interview and a much footage of First Nations art and nature itself before we left Alberta. Then I had to put it all together in iMovie with the help of several other programs to get my final product:
Overall, I think it turned out pretty well and definitely answered the driving question of the project, but what I learned from a video skills standpoint was much different. I think this project really taught me about interviews and filming in the field, and reinstate the importance of planning ahead what you will shoot when you have a limited amount of time, and just planning in general. The next video also has a blog post on it, which explains it in much more detail than I will here, and I definitely recommend checking it out. The project that I’m talking about the running a remake project. The premise of the project was that we had to remake a horror short film called Run with the tools at our disposal. I was put into a group with Thomas and Liam, and the project ultimately began with a storyboard and screenplay in the planning part of the project. We also made a call sheet so that we would know when to meet to film it. We did our first draft, and here it is:
Not bad right? Well, wrong, after feedback we found we had a LOT to revise, so we set out to do our second draft. This draft was better in terms of the camera angles and timing, but since this time we had to make the sound ourselves, which we didn’t realize in the first draft, it was kind of a downgrade, but we had a due date, and after messing with the audio for two hours straight I think I got it to the best it would get.
Overall, I think we did alright on the final video, because although the actual video is good, the audio was kind of disappointing. That doesn’t mean it wasn’t a learning experience, and it really helped give me a better understanding of how to use and replicate camera angles, as well as give me a lot more experience in GarageBand. The next video(s) are actually all part of the same project, which I explain more in my blog post about it, which I recommend reading if you have the time. For this project I was put in a group with Noah, Kaia, and Rhiann. This project was all about revolutions, and we had to do a video on the French, American, and Russian revolutions, as well as another revolution of our choice, which could be a repeat. There were several video types to choose from, song, explain everything, heritage minute, and John Green. After doing research on the French Revolution, we decided to do a song. We made a storyboard and screenplay, and then worked on the lyrics. We decided to put in a part in French as well, because it’s the French Revolution. The hardest part was pretty much just writing the lyrics, so after getting all the lyrics, and the music itself, we actually recorded everything. Then we finished editing, and here is our song:
It might have been good if it weren’t for a couple major flaws. 1. Being inconsistent audio, which resulted in many of are lyrics being unintelligible, and 2. We didn’t put subtitles on the French part. These two flaws really downgraded the quality of the song, so I guess I learned that I should actually watch what we make before we upload it, and that subtitles are generally a good idea. Moving on to the next video, we had the American revolution. We decided to do this one John Green style, but before we started the video, we had to finish a screenplay and storyboard. This video required a lot of research, which was a major part of the video, and animations were also a challenge. The actual physical filming wasn’t too hard to do, as it was pretty much just Rhiann talking the whole time. But after we merged it all together through the power of editing, we had our video:
I personally think this video turned out pretty well, and did a good job of explaining the revolution and it’s parts. The animations also turned out well, which is good because our group struggled with them for a bit. Anyways, next video, and next revolution, and next research! The next revolution being the Russian revolution, and the type of video being the heritage minute, and the research being a bunch of research. We did the usual storyboard and screenplay, which took longer than for the previous videos because we had to plan out all the acting and scenes. Costume was actually a part of the video, so we had to organize who would bring that as well. Then we got around to actually filming which took a while, not because it was hard to do, just because we had a lot of shots to take. Anyways, an eternity of applying and removing fake moustaches, and a bunch of editing, we finished our video:
I though this one was really good, better than the last two revolution videos we did at the very least. I just thought it did a really good job of explaining the Russian revolution, and had good scenes to showcase important moments. While making this video, we didn’t really have any problems either, our biggest concern was our due date. Moving on to the next, and final, revolution video, we decided to have another round at a song for the French Revolution. We start out with the screenplay and storyboard, but didn’t have to do as much research this time around because we already had done research the first time we did it. We still had to write new lyrics though, which took a while to do, and we tried to put more information about the revolution this time around. While not particularly challenging, like I said, it took a while to do. There were also drawing that needed to be done which also took a while. Because of the time these tasks were taking up, we barely managed to finish editing in time of the due date, but we still got in our finished song.
This was basically our first French Revolution song, just better in every way. We basically took everything we had learned from the first video and put it to good use. There was no more weird audio, and the lyrics told more about the revolution itself. There was no need for subtitles in this one, as we axed the French part because we realized we didn’t like it. The main challenge to creating this was getting it in on time, and although my singing skills did not improve, my ability to work fast certainly did. That was it for the Revolutions project, but we still had one more video left in the term. That video was the take your kid to work day video, which I actually have a blog post about. You should give that a read, but if you can’t, I’ll give you the rundown. We had take your kid to work day, and we had to make a video about our experience and what we learned, and how the jobs at wherever the place is at give back to the community. I won’t talk about too much what actually happened at take your kid to work day, I have a post for that, but I will explain my video. First things first, we obviously could only film on the day we where there, which added a bit of pressure to get all the shots I needed. I also had to conduct an interview in the time I had to film, and I didn’t have a mic or anything, but I used what I had. After getting the footage I needed, I edited it later, and finished my video:
It turned out well for what it was supposed to be, and I think the main challenge was actually getting everything filmed on time, and iMovie breaking, although the project did help me refresh my interview skills. So, know that we’ve gone through all the videos, it’s time to talk about the competencies.
For the first competency, I think I have demonstrated it in pretty much every video I did, as I used technology in every one of them, which has helped bring me forward in demonstrating the other competencies. For Knowledge Constructor, I think several of my videos have shown this competency, notably the revolutions videos, as me and my group used several different digital tools to make them into meaningful experiences that fulfilled their role at the same time. For innovative designer, I think I have also demonstrated competency in several of my video, most prominent among them being the run final draft, were I used like five different apps, and bizarre combinations of screen recordings and GarageBand to try and fix the audio, and surprisingly some of them actually worked. For the computational thinker competency, I think I displayed it prominently in again the run remake final draft, as I developed many strategies to try and fix the many problems, and tested them all with digital tools to see if they would work, some of which did, and some of which didn’t. And for the final milestone, creative communicator, I believe I have proven myself competent and shown it in many of my videos, one of them being my Alberta field school video, as I used many different tools and platforms to express myself creatively in my final product. I think that’s about everything covering my first maker term this year, I now this post was a biggie, so thanks for sticking around until the end!
A couple weeks ago we were able to participate in take your kid to work day, and we had to make a video and write a blog post about our experience! I had participated in take your kid to work day before, but I had been much younger, and I don’t really remember much about what happened. Because of this, this was almost a completely new experience for me, and I was pretty excited to see what it would be like. However, we had to make a video of this event, and had to do a bit of pre-planning:
Mine was a basic video plan, and some interview questions, although not everything I put on there actually ended up in my video. Getting onto what actually happened, The place I went to was Richard McBride elementary school, which is where my mom teaches a grade one and two split class. After we got there, The day started out pretty straightforward, with me helping my mom set up the classroom before the kids arrived. The kid’s first class was actually music, so me and my mom had some free time. We used this time to get me a visitor name tag, and my mom introduced me to some of her colleagues. I helped the kids with reading in one of her friends’s classrooms, and read them a couple of stories. Then the kids from my mom’s class came back, so I went back to my mom’s classroom. There, I helped check the kids spelling activities, which was entertaining for the first five minutes, but then started getting tedious. Then the kids left for recess, but there were still things to do, and my mom and I went and set up decorational poppies for some meeting in the gym. I never got to see the meeting though, as soon as recess ended I was back to marking assignments. But near the end of the day, we did a class reading, and I got to read a book to the whole class. Then my mom also read a book to her class, and I used the free time to get some shots of the school. Then the kids had some free time at the end of the day, which I used to get more shots of the school for my video. Eventually the kids where dismissed, but that isn’t where take your kid to work day ended. I reflected on my day and what I learned in this video:
So in conclusion, I had a great experience during take your kid to work day, and was able to gain some insight on what it is really like to be a teacher.
 We learned a lot about some of the events that happened, and the role nationalism played. I think a general example of nationalism during the colonization of Africa was the racism that took place. Lots of the Europeans doing the colonization looked down on the Africans because they were different than them, which is pretty nationalistic. But that’s just one example of the many ways nationalism was involved in the colonization of Africa, and you might say that nationalism caused it in the first place. After we learned about nationalism and the colonization of Africa, the memes part of the project came into play. We started off by learning about memes themselves, as well as Richard Dawkins theory which I explain in my other post, and simply put we learned that memes are ideas that spread from person to person. Then we started to connect memes to what we had learned previously about nationalism and colonialism, and it was now that we started to answer the driving question: “How can we use current memes to comment on the significance and consequences of nationalism around the world?” We would answer the driving question by making some memes ourselves, except this time around they would be strictly about the colonization of Africa and nationalism. We quickly got to work in making our memes, and we started out by making some ideas. Here are some of my ideas for memes:


 And these are memes, but they don’t have to be funny internet pictures. Memes at their simplest are just ideas spread from mind to mind. We also learned about some of Richard Dawkins’s ideas about memes. Richard Dawkins came up with the idea that the selfish gene and laws of Darwinian evolution apply to information and culture. He thought that ideas could spread, reproduce, evolve, mutate, and die. If you think about it, this is what is happening with the internet memes you see online, they spread as more people see them, people make more of them, they mutate into different memes, and once the meme becomes irrelevant and nobody uses it or finds it funny anymore it dies. To show this, we had to make some memes of our own, and we used an app called Tik Tok to do it. If you haven’t heard of Tik Tok before, it’s basically a social media platform for sharing short videos, and it’s popularity has skyrocketed in the past couple years. Lots of the videos are dances, trends, and as with any social media platform, memes. This project was the first time I used Tik Tok, so if you want to find out more about it I found this informative video:
 We also learned about the hero’s journey, which shows the journey the protagonist takes in the story, and this isn’t only in Star Wars, it’s in Harry Potter, The Lord of the Rings, and pretty much every story you could think of.
  By this point you may be wondering, what does all this stuff about story spines and heroes journeys have to do with the exhibition? Well, we were actually going to be writing our very own Star Wars short story, but we weren’t going to do it alone. Last exhibition we were put into exhibition groups, but this year our exhibition group members would each be writing a section of the story, and my group members where

 Even though our story was done, my group was still far from finished, because we had the actual exhibition coming up. We still had to plan what the library would look like for the exhibition, and we had to work on what we were presenting for the exhibition. Yes, we were showing off our stories at the exhibition, but we also had to make an artifact which expressed our section of the story. I decided I wanted to make the letter the protagonist receives when he is invited onboard the Death Star, complete with the imperial seal. To help us make our artifacts, we used the LAUNCH process, which we recorded in a journal in six phases. This video explains the artifact I created, as well as phases of the LAUNCH journal which helped me create my artifact:


 Overall, I had a great time at the exhibition and would say it has been my favourite one yet, and I was also really pleased with how my artifact and my story turned out, and to top it all off we got to see the Rise of Skywalker in the theatre the day after the exhibition! Well, that’s about it for this blog post, remember to stay tuned for more!


