Rich, white, and in charge.

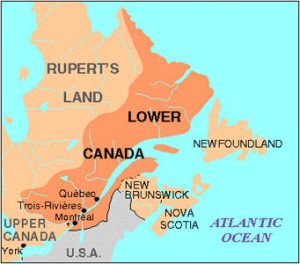
Confederation. It brought together the land we today call home. The road to confederation was not an easy one, but we have currently been learning all about it. At first, Upper and lower Canada consisted of the French and the English. There French and the English never really saw eye to eye, and this was for many reasons. First of all, there was the obvious language barrier, then there was the fact that the French felt belittled by the English, and rightfully so. The English controlled the government and had power over all decisions made in Canada, which led to more and more of a divide between the English and the French. Sometimes when certain things are required by one side but aren’t exactly beneficial to the other side, compromise isn’t  always the first resort. An example of this with the French and English could be seen in the rebellions of 1837, where the French held two separate uprisings against the British. The rebellions occurred for many reasons regarding things like land, money, power, and rights, but also for responsible government. The French wanted a responsible government, which is a government that requires an elective assembly to make decisions rather than being run by the family compact, which consisted of rich men that had been appointed by the British government. The French wanted change, and responsible government was that change. With a responsible government, the French could finally be able to have a say in matters of parliament, therefore have a higher chance of having their demands met, so they fought for this chance. The uprisings in upper and lower Canada caused some concern in the British government. In order to find the root of the problem, Queen Victoria appointed a man named Lord Durham (the governor general of British North America) to go and further investigate what caused the recent rebellious activity in upper and Lower Canada. Lord Durham’s final report back to Britain brought upon the Union act. The union act would mean that there would be no more Upper and Lower Canada, but one colony that consisted of Canada East and Canada West. Also, Canada would finally be a separate colony from Britain.

Years later, responsible government was finally achieved by none other than Lord Elgin, lord Durham’s son in law. Coincidence, I think not. It didn’t end here though. A group of politicians including George brown, John A.macdonald, George Cartier, and more, had a bigger plan on how they could get not only Canada East and west, but many of the other surrounding colonies to come together as one big colony. This idea was of confederation, the coming together of what we today know as Canada.

To display our knowledge of confederation and everything leading up to it, our class had started a project. We had previously been watching a lot of heritage minutes which are minute long videos on people places or events that are an important piece of Canadien history. For our project, we were tasked with creating our own heritage minute on a topic of our choice that hadn’t already had a heritage minute made about it. After observing and analyzing more heritage minutes that I can count, we actually got to FaceTime and interview the managing editor of Historica Canada, Davida Aronovitch. If you didn’t already know, Historica Canada is the company that creates heritage minutes. For the heritage minute that my group and I would be making, my group consisted of Adlih and Robin. We had decided on an overall topic of the mother’s of confederation. We chose this topic because of the fact that many people know of the fathers of confederation, but not many people know of the women who worked behind the scenes when bringing Canada together. We felt that it was only right to bring attention to the woman that made confederation possible, because they didn’t get all of the recognition that they truly deserved for their efforts back then, so why not give it to them now. Once we had chosen our topic we had to do the research. We researched a handful of woman who qualified as mothers of confederation, until we narrowed it down to one woman who we felt best fit our project. We chose Anne Brown, wife of George Brown, one of the main fathers of confederation. Anne is a mother of confederation because of the major influence she had over her husband George. She convinced him not only to apologize to the French, but to team up with his rival, John A. Macdonald, to push for confederation. Without Anne’s hold over George, he would’ve never set aside his hatred for John, and they would’ve never teamed up and come up with the magnificent idea of bringing all of the colonies together as one.

We had also been learning about proper script making and how to create a professional script like the ones used for movies and tv shows. Underneath is a copy of the script that my group had created for our heritage minute. We had planned that our heritage minute would be from the perspective of Anne, and that she would be writing a letter to George. We would include flashbacks of important events in Anne’s life, like when she first met George, and when George left for the conference in Charlottetown. Also, the letter would include dialogue of Anne convincing George to team up with John.A, and reassuring him that it is the right decision.

After the script we created a storyboard of all the events that would take place from the script. Then we started to actually film. After getting a peer critique on our first draft from both my classmates  and teacher, my group worked on editing the video and we ended up getting our second draft. For the second draft we added redid the audio, and added some scenes before yet another critique. Except this time, we showed not only our peers, but a bunch of other grade nines from in a different humanities class. We fixed the last few things in our video and finished off the project with a finished product that we were proud of, and I think it’s safe to say that we did a pretty great job!

here is our final heritage minute video.

This project really taught me the depth of how long and hard the process of bringing Canada together really was. Not only that, but how to successfully create an aestheticly pleasing and informational heritage minute. To think, before this project, I didn’t even know what a heritage minute was. Through the research of this project I was even able to discover my favourite heritage minute on Viola Desmond. All of the actors in this minute were on point and really gave the film emotion, plus, the message or really powerful and is one of the most interesting of all of the heritage minutes i have watched. Overall, I was really proud of the end product of that my group had created and perfected, and had a great time during the creating  process. I hope to do another project like this in the future!

The Illest Road Trip Of All Time

A new project has come about in math and it is called The Illest Road Trip Of All Time. We were offered money (imaginary money) to create our own super cool road trip of a life time. A  lot of work went into creating and planning out the most amazingly awesome road trip of all time, and the first thing I had to figure out where I was going to go. I decided that I wanted to take a long trip to somewhere tropical that I had never been to before, and ended up deciding on Costa Rica. The criteria stated that your trip had to start and end in New York City, but before I could plan out where to visit along the way, I had to figure out how much everything would cost. I was given 10,000 dollars to cover food, luggage, accommodation, transportation, and any activities that I might want to do along the way. To calculate all of these costs. I also earned a bonus 8000 dollars from a math mini challenge that my group succeeded in.

I had to pick what kind of food, lodging, and baggage I would purchase, than total up these costs. My overall baggage ended up costing 75$, and food and lodging came to 200$ per day. I then took these answers and created a total expense equation. The way I did this was by taking the cost of lodging per day (200$), multiplying it by the number of days in the trip (X), and adding the cost of baggage (75$). My equation was y= 200 X + 75, and once I figured out how many days I wanted this trip to last, I would know how much everything would cost. In my case, the cost would be 7075$ because I wanted my trip to be 35 days and 200 x 35 + 75 = 7075$.


Another thing I had to take into consideration cost wise was my transportation. I had a choice between five cars, some cheap, some expensive, but I went with the Cadillac Escalade Hybrid. The reason for this was because the car is nice and spacious, which could be useful if I needed to sleep in my car for a night. To calculate how many gallons of gas I would need for the trip I had to add the cost of the car per day to the amount of days in my trip then divide by the total gallons needed for the trip. My equation was y = 98 x 35 + 1135.96 and the answer is 4565.96$.

I took the two totals from both of my previous equations, put them on a graph, and this is what I came up with.


Next I had to plan out all the stops that I would take between New-York and Costa Rica. For each day, you are only allowed to drive for ten hours before stopping. My first stop is in Philadelphia where I will visit the Philadelphia zoo (tickets cost 17$), then stay the night at a hotel. After Philadelphia I will make a quick stop in Kingsport for gas and get back on the road. My next stop is Mississippi, and there I will visit the town of Gulfport. I’ll then go to Houston Texas and check out the Downtown Aquarium (64.51$ for a ticket) and Space Center Houston (admission is 29.95$).

After Houston, I will go to General Escobedo, which is a small town in Mexico. I’ll stay there for a night and tour around the small town. My next stop is in the middle of a highway in Mexico, and the only reason I would stop there is to sleep in my car because there aren’t any hotels around there. After that I’ll stop in a small town in Mexico called Metehuala. I will stay the night there, wandering around the town and seeing what it has to offer before I head out again to yet another small town called Soyaniquilpan de Juárez. And after Soyaniquilpan de Juárez, i will go to a town called Tres Valles and hike around there, then I will stay the night at my next destination, Chiapas. Chiapas is filled with beautiful waterfalls, dense forests, beautiful mountains, and a quaint little towns. I will explore all of this when I arrive there, and will stay there for a couple days. San Cristóbal is the next beautiful town that I will stay at and explore before I find my way to Guatemala City. When I get to Guatemala City, I will visit the Cathedral of Guatemala City, National palace, and the Pacaya Volcano. I will also take a day to wonder around the city before I leave for the next place on my list. Teguicigalpa is the capital of Honduras and I plan on stopping by to see the city and walk around befor I go to Managua, the capital city of Nicaragua. There I will visit all of its beautiful beaches and cool monuments, before I reach my Final destination of Costa Rica.

I will stay in Costa Rica for around ten days and will get a seven day tour (tour costs 749$) then will explore on my own for the remaining three days. I will take the same route I came on when traveling back to New York, except I won’t be touring around, ill just stop if I need gas, food or sleep, but that was my complete road trip.

The last portion of the project were the sponsorships. We were offered three sponsorships to choose from, Coca Cola, Pepsi, and Snapple. Each sponsorship offered money each day and we had to take this information and create an equation for each sponsorship. Underneath is a picture of the cost information of each sponsorship

For Coca Cola I found the answer by multiplying the mount of days by six, and then seeing how mush more I would have to add or subtract to get the correct cost. My equation for the Coca Cola sponsorship was Y= x6+104. Then I took my answer and tested my equation with the different amount of days and proved that my equation was correct because the costs were the same as the ones in the table. I did the same thing with the other two sponsorships and for Pepsi, the equation was Y= x10+60, and for Snapple, the equation was Y= x22-228.
I took this information and created a graph featuring how much each sponsorship would go up every five days. To find out the answers, I took the number of days and put that in place of the x in the equation. The answer to that would be the number that you would put on the graph. This is the graph that I created.

This project has inspired me to travel to these places in the future and has been a great way of enforcing the laws of linear equations in a fun and informative way.

It’s time for mPOL’s (mid-year presentations of learning)

They’re back! You may be wondering what in the world I am talking about. I’m talking about only the single most important thing in PLP history! That’s right, its student led conferences. I am prepared to share with you examples of work that I have completed this year which all reflect back to my driving question, “How am I going to progress as a learner before the end of the school year?”
I have four main PLP classes which are maker, humanities, math and science. The very first example will be a project that took place in my maker class. When referring back to past projects that I have done in this particular class, the decision of which one to talk about was not hard. I picked the Star Wars exhibition project because it was, in my opinion, the most interesting. I got to show off my creativity and love for art when hand painting my backdrop, and creating my three sculptures out of clay. It was also quite interesting to learn all about the realm of Star Wars. Keeping this in mind, there is always room for improvement. I know that even in a project like this that I enjoyed so much, I could still improve upon several things such as the décor of my station, of which could’ve been a bit more detailed, and the quality of clay that I chose; one that didn’t crack and fall apart so easily. Also, I would leave myself more time to edit and revise the written portion of my display.


Another big part of the process of making this good project great, was working with the eighth grade PLP kids in order to decorate the room and plan out the night of the exhibition. Through working with the grade eights, I realized that teamwork is really vital to the success of our projects. In order to have a team run smoothly, you have to be able to compromise when it comes to ideas, make your team members feel heard and appreciated, and definatly make sure that the whole team is in the loop about anything and everything, in regards to decisions made or even who’s bringing what.
Additionally, throughout the process of planning and building this project, I learned some valuable skills, not only about group work, but also about time management and the wonders of planning ahead. I feel that improving my pre-planning skills is an important part of helping me progress as a learner throughout the school year.
My next example is a project that was a mixture of humanities and math. This was my metaphor machines project. Although not all aspects of this project reflected my best work, I had learned from both, my successes and my challenges during the process. For the most part, I was pleasantly surprised with the direction of this project, and it reflected e skills that I had already learned, such as how to work successfully with my team members, and most importantly, how to remain calm under pressure.

In this project, however, the most improvement could have been made in the final video. While keeping in mind that this was a group project and I didn’t have complete control over the making of the video, I still know that I could’ve taken more time to revise and edit the video to fix some of the glaring mistakes (obvious to me, even if others couldn’t see them).
One skill, in particular, that that this project demonstrates that I could benefit from working on improving, is my time management. I often feel that this has a lot to do with my mindset. When a project seems initially complicated, I sometimes convince myself that it’s a lot harder than it would be if I just split up my work, and took it a little bit at a time. I feel that the first step to overcoming this challenge is to stop overthinking things, start my projects earlier, portion out my work more evenly throughout the amount of time that was given for the project and in a way that ensures I get it done on time.

The last example a project that, much like the metaphor machines project, was for mixture of two classes, humanities and science. I found this project to be on the more difficult side. Although the research and script were fun to do, the process of creating the final video was quite overwhelming for me. This was for two reasons, I had many bad experiences in the past with the filming app that we were supposed to use, and again, I had difficulty portioning out my work time. Another helping factor to my stress during this project was the fact that I decided instead of filming regularly like most others did, I would draw out and animate my video. Note to self, it’s not as easy as you think. Although I had a great deal of struggle trying to complete this project, the learning that took place made up for that. I had learned not only about the land, climate, and wildlife of all different regions of Canada, bit I also learned a great deal on all the different matter cycles and their importance.

In this year, I have pin pointed weaknesses and developed ways to overcome them, but have also exploited my strengths and learned how to use them to my advantage. I now have a plan to overcome my time management in three parts. I will look at each major project within one to two days, ask questions if I need any clarification on anything, then not only break down the work into portions, but put it on a calendar so that there is something physically there to motivate me. I feel like this plan will help me further progress as a learner, and will be something that will not only benefit me this year, but will become a habit that will sticks with me all the way from high school, to university, and beyond.

A long time ago, in an exhibition far, far away

If the title didn’t already give it away, this year’s first exhibition theme was Star Wars. Like many exhibitions I have done in the past, this project was led by an inquiry question that related to the overall theme (Star Wars). We had recently studied the difference between open and closed ended questions, and how to refine our inquiries to sound more knowledgeable, well put together, and possibly more simplified or broadened depending on the question. With this new information, we could come up with more professional inquiries that take more effort to answer than a simple yes or no, but still aren’t too complicated to present and explain to an audience. With much thought and research, I came up with a question that I found both suitable to my interests, and was open ended enough to promote proper research and investigation.  My question was “What are the similarities between the animals on Earth, and those on Alderaan?”, which was a more narrowed down and less sloppy version of my original question of “What are the similarities and differences between the plants and animals in Star Wars and the plants and animals in Earth?”.

The research portion of the project began with watching the Star Wars Movies, which was helpful for somebody like me who had never seen Star Wars before then.  Every Friday they would play one or two of the Star Wars movies after school for anybody who was interested to come and watch. Unfortunately, I missed the movie that would’ve contained any information on my topic, so most of my research was founded from a handy website called Wookiepedia. Although not all of my information was obtained from this site, it was indeed the most helpful.  When searching the web, I was specifically looking for anything regarding three animals from Alderaan that I previously picked out. Those were the Vorn tiger, Grazer, and Iraida.  I was searching for any possible links between these foreign animals, and some similar creatures found on earth that could have influenced certain traits or features that the ones from Alderaan portray.   I took what I had learned, narrowed down the key points to feature in my presentation, and found ways of rewording my information into a state that could be understood by everyone, including those who knew nothing about Star Wars.

The first Alderanian animal, the grazer, had the plump complexion of a chunky farm animal such as a pig or cow. That, and the fact that they are both farm animals used for their meat and milk make the pig and cow perfect candidates. In addition, the grazer is a herbivore and has big udders, just like the pig and the cow.

The Vorn Tiger, which is blue in colour, has tremendous horns, big pointy teeth, and a muscular build. The obvious choice of an earthling doppelganger for this animal was the Tiger. With the major similarities in physical features such as teeth and body shape, as well as a similar hunting style, the connection is hard not to see. Tigers are solitary hunters, as are Vorn Tigers.  They both also mark their territory with scrapes and scratch marks.  The only difference between the two is that the Vorn Tiger does this using its horns rather than its claws.

Lastly was the Iraida, a big brown furry creature with humongous ears and a pointy snout like you wouldn’t believe.  I found many resemblances to a bat when I researched this animal. The ears for one, grant this creature impeccable hearing, which is one of a bats most well-known qualities.  Iraidas are also quite intelligent and have a higher success rate that other animals when hunting, similar to bats.


The research was completed and it was time to start thinking of what I could do to creatively and effectively showcase my information.  I wanted to go  beyond a poster board, so I decided that instead I would make models of the animals out of clay, and would paint a backdrop to have a place to show what my question was and what the world of Alderaan looked like (before it was blown up and wiped out of existence).  I gathered all possible materials I would need and got to work.  By the time I was finished, I never wanted to touch another clay figure again.  The amount of times my figures cracked and pieces broke off was more than I could count.  During this project, hot glue was my best friend.  With that said, I still managed to pull it off and was happy with my final product.  I displayed all three figures on white boxes with a little description on each one. Behind the figures was the painting that I had made, which turned out great in my opinion, and that would also display my inquiry question.  I added a splash of colour to my mostly white display with some small fake trees, which really added to outdoorsy Alderaan setting.

While I was in the process of perfecting my project, I also had to work with the rest of my class, plus the grade eight PLP students, to plan and decorate the room that our exhibition was taking place in. Everybody was put into one of two categories based on their question; you were ether on the light side or the dark side. I was put into the light side.  We had different students devoted to different aspects of preparing the room.  Some people did the decorations, some did the food, some mapped out the room and where things went, and some organized interactions with the audience, such as skits and games.

We decided to all dress up as characters from Star Wars that would make sense for our inquiry questions.  I went as Breha Organa, the adopted mother of Princess Leia.  I chose her because she was one of the only important characters from Alderaan that wasn’t Leia (I couldn’t do Leia because someone else already chose her). Then we started to list food items and games that we could create and bring and listed who could bring what.

From there, we divided everyone up into sub groups again based on their inquiries.  There was the science group, philosophical group, and the tech group. The room was divided into three, each area contained one of the three groups.  We all decided to model the room after the rebel base on Hoth. Hoth is an ice planet so we added cotton on the windowsills to act as snow, tinted the lights blue with coloured paper, and made the room cold by opening the windows. The first section of the room was supposed to be the outside of the rebel base.  There we had all the people with scientific questions set up their stations.  We used bed sheets to act as walls that divided the three sections. The second section was the first half of the rebel base where the tech group was, as well as the Admiral snack bar and the pin the lightsaber on Yoda.  This section was also where the stage was for the skits that some students prepared, acting out important scenes from Star Wars. The last section was the philosophical group who were stationed at the far end of the rebel base.


When people first started making their way through the exhibition, my anxiety was off the charts.  I was nervous that nobody would like my work or would find it boring, but to my surprise, they seemed quite engaged in what I was saying.  With this said, there is always room for improvement and there are actually quite a few things I would change if I had to redo it all over again.  For one, I would bring a sweater; that room was freezing.  I would also get some better clay that didn’t fall apart so easy.  I wish I would’ve left myself more time to do something more with the boxes that I displayed my figures on, but due to lack of time management, I couldn’t go ahead with my plans of painting them to look like tree stumps, or painting them at all for that matter. There are always details that you wish you could go back and fix, but overall, I was very proud of myself and my work and am excited to see what’s in store for the next exhibition to come.

These are some photos of my final project and how everything turned out in the end.


Take your kid to work day

Have you ever wondered what your parents really do when they go to work everyday? Well take your kid to work day is a time where you can learn all about your parent’s job and what they do day in and day out to keep food on the table.


Since my mother is a principal, I spent the day at False Creek Elementary School.  While I was there, I helped fifth graders with their projects, watched my mom type out some important “principal stuff” and met some of my moms colleagues.


One colleague that I interviewed was a woman named Maika who works in the school office as an OAA (office assistant administrator/secretary). She reported that you have to have many different abilities in able to excel at her job, one of which being organization. In this job, you would need to be quite efficient and organized in order to keep track of important documents and files. In a job like this, losing a document could be a lot worse than it seems, because they aren’t all things that can be quickly redone or replaced. Another portion of Miaka’s job is first aid. This means handing out ice packs and bandaids at recess and lunch, cleaning scrapes, and determining whether the ill kid wandering through the office is well enough to stay at school or not. To apply for this job, you should’ve had some previous University schooling or already had experience in this field. At the least, you would need to be quick, flexible and able to learn on the job.


Throughout my day at False Creek Elementary, I also met and interviewed a kindergarten teacher named Judith MacPherson. Judith, like Maika, has to be quite organized in her line of work, and also has to be very bright and quite understanding when working with small children all day. Being a teacher means that you have to be a people person, because you are working with a wide array of different student abilities and personalities that all learn at their own pace and have their own learning style. During a regular day on the job, there are some tasks that are to be done regularly like taking attendance, creating your lesson plan, and in doing so, also modeling something, teaching it, then letting the kids try it for themselves. There is an old saying that says at the beginning of the year, you are the sage on the stage, then you move to be the guide on the side. Being a teacher requires you to always be on your feet, grow with what’s happening, and have high standards, but before you can begin your journey as a teacher, there are some specific requirements that you must have, as there is for all jobs. Before Judith could become a teacher at False Creek Elementary, she was required to have a bachelors degree in the educational fields, and it helps that she had had previous experience in teaching before she worked at False Creek. If Judith were to feel the need to take her job to the next step, she could potentially work toward a VP position or eventually even a position as a principal, which would require a masters degree.


This is Judith with one of her students


So far I have talked to teachers and secretaries, but I haven’t touched bases on the one person that made my visit to False Creek possible, my mom (a.k.a the principal). My mother’s job is basically to run the school. This job necessitates that you have not only people skills and organizational skills, but that you also possess leadership, public speaking, Communication, and Diplomacy skills. You need to be the kind of person that can see the whole picture and has an educational vision for the school. A principal always has work. Whenever another teacher, parent, or student has a problem, it’s the principal’s job to do one of two things, either solve the problem or help them solve the problem themselves. Every day there are certain jobs that need to be done, some of which are morning announcements, sending memos to teachers and running various meetings. But these aren’t even the beginning, there are some jobs that aren’t necessarily done daily, but are equally as important. These consist of writing the monthly newsletter, running student leadership programs, talking with parents, running assemblies, keeping track of what kids are to be put in what classes, and hiring new teachers. These jobs are all crucial to maintaining an organized and smooth running school, and it’s all up to the principal to keep it this way. In order to even become a principal, you must have received a masters degree, and go through a highly intense and stressful interview process. Only then can you be placed to work as a principal. If my mother was ever to wanting to climb the metaphorical ladder of the educational profession, the next step would be to become a director of instruction. From their you could become an assistant superintendent, and at the very top you have the superintendent.


This Is me and my mom having a mother daughter selfie


This whole take your kid to work day has made me think more about what I might want to do in the future. At this point in time, I don’t think that I could see myself working in this field, mostly because I’m not overly passionate about it, but that doesn’t mean that I wouldn’t be capable of pursuing a career in this particular area. I actually think I could be a pretty decent secretary, or teacher, or even principal. I feel that I have very strong people skills, and am quite good at problem solving, which are both attributes that would be looked for in something like a principal. I can learn quick and am not easily angered, this is also another skill that I pride myself on, because keeping your calm helps you think straight when it comes down to dealing with things or perhaps that especially get on your nerves. All these skills could be deemed very useful in many situations that anyone working in a school would face all the time in their line of work.


A world of steam

Have you ever heard of steampunk? Or maybe you have but have no idea what it is. Well by the time you finish reading, you will know all about it! Steampunk is a concept of retro futurism, or in other words, it’s basically the idea of having these extravagant futuristic gadgets and spectacular steam powered machinery being used in a time period around the 1800’s (the Victorian era) that wouldn’t have had such advanced tech at the time.

Now we know what steampunk is, but if we were to Imagine what it looked like, what would you picture? A lot of people might see a lot of gears and Victorian styled clothing and those cool looking goggles that everyone seems to associate with steampunk. This is all thanks to a little thing called the steampunk aesthetic. The steampunk aesthetic uses the theme of taking something from the future and putting it in the past, and expands off of it by exposing what’s on the inside and having it shown on the outside (exposed gears, wires, pipes etc…). Anything with a steampunk aesthetic to it would usually have a similar colour scheme of brass and copper colours, as well as gold and sometimes silver. If your not already a steampunk expert by now, click here for more details regarding everything steampunk.

I dug deeper into the concept of steampunk and started to think of an inquiry question concerning all that I have learned about the subject. After toying with a few question ideas, I finally made the decision to go with this one “how could we make the world steampunk, or is it even possible?” . In my opinion it could very well possible if we stopped using fossil fuels and other sources of energy and switched to purely steam power. There would be no internet, no Netflix, but if it came down to it, I feel like it could potentially be possible. The only thing standing in the way of a steampunk world, is the cooperation of the people. Not everyone would have the will power to ditch the internet and say goodbye to Instagram forever. And a change in society of this size would take a whole lot of convincing, and people can be pretty stubborn when it comes to parting with their beloved technology.

So in conclusion to my question of  “how could we make the world steampunk, or it even possible” I propose that yes, it could very well be possible if we switched to steam power only. With this said, it probably wouldn’t ever happen, because a big change like this would not appeal the majority of the population. Sorry to all the steampunk lovers out there, I hope I didn’t completely crush your dreams.👍

Crane Brinton and the Canadian Revolution


Revolution, what is it? Well according to Crane Brintons theory, it is an negative phenomenon that can be compared to a disease. This is because it is said to have stages that are similar to the attributes of someone coming down with a cold or fever, and can be cured in a similar way to that of a sickness. In his theory, he stated that all revolutions have somewhat similar stages. The first one being the incubation stage where symptoms are shown, like common a financial crisis and a sense of injustice or abuse from the government. As well as an incompetent ruler, a shift in alliances, a division between social classes, and a military victory. Then there is the second stage, the moderate stage. In the moderate stage, led by a moderate leader who tries to use compromise instead of violence. In the moderate stage there are usually more protests and violence, but only on a small scale. The third stage is where the violence drastically increases, they usually end up killing the former leader, the radicals take over control from the government, and with their new leader in charge and their armies stronger than ever, they go to war. The very last stage is the recovery stage. In this stage, the violence lessens, the radicals are no longer in power, things start to return to normal, and it ends in ether peace or war.

Now that you know about Crane Brintons theory of revolution, you can better understand my inquiry question regarding that theory. My question was why didn’t Canada ever have a revolution? I came up with this question when I was thinking about all of the countries that had revolutions and how most of them ended up going to war. So I thought to myself, canadiens fought in the war, but I have never heard of a revolution taking place in Canada. Well it turns out I was wrong, there was a revolution in Canada, maybe not on that is very well known, but it did in fact happen.

In 1837, with the rebellion of both upper and lower Canada. This could be considered part of the first stage of Brinton’s theory, the incubation stage. This is because they started to want a new and better government, which could be considered to be like the beginning symptoms of a cold. The third stage would’ve been years later when the colonial oligarchy fell and the new order was that each state would be self governed. The fourth and final stage would’ve taken place in Quebec 1864, when the proposal for a general government was denied and things ended in peace and started to somewhat normalize like getting over a cold.

In conclusion, the answer to my question of why wasn’t there a revolution was to the contrary of what I had thought it would be, because there was in fact a revolution in Canada. Some of the sights that I used to research this topic are as listed below:

https://janetajzenstat.wordpress.com/2011/02/15/canadas-revolution/
http://www.thecanadianencyclopedia.ca/en/article/rebellion-in-upper-canada/
https://www.marxists.org/archive/dowson/leaflets/comingCANrev.html
https://en.m.wikipedia.org/wiki/Canadian_identity
http://www.let.rug.nl/usa/essays/before-1800/was-the-american-revolution-a-revolution/crane-brintons-theory-of-revolution.php

Frankenstuffies, the animals of the future

Frankenstuffie. What is it you might ask? It is the name of one of the biggest projects we’ve done all year. We were tasked to pick a region, matter cycle, and two animals in our region to create a short video. The video was about how an interference in a matter cycle caused an animal of your choice to basically take on the features of another animal to help its chances of survival.

My region was the interior plains, a beautiful place with diverse ecosystems and a wide variety of different species of wildlife. One of those amazing species is the white tailed deer. I had chosen the white tailed deer to be the main focus of my story. Considering that I had previously done a project on white tailed deer, and had also recently visited Calgary (which is in the interior plains), the research portion of the project was quite easy for me. Some things I had to know about my region were things like it’s overall climate, the wild life that inhabited the region, and it’s vegetation. Once I knew all that I needed to know, I could move on to creating the story episodes. The story had to be written in episodes, and all the episodes were part of an overall story board. For example, episode one was the exposition, which established what was happening. Episodes two and three were the rising action, which introduced some sort of issue. The fourth was the climax, where some sort of major conflict occurs, and the last two episodes were the falling action and the impact, where they show the reaction and consequences of the previous events.


I really enjoyed writing the episodes, I felt like I could get really creative and was very proud of the end product. When I was done writing them up, I had to edit them and then change them to be past tense instead of present. This was hard to do for me, mostly because I felt like when I was making it past tense, it took away from the story and made it a bit more challenging to understand. With this in mind, it wasn’t as bad as I thought it would be in the end. The most difficulty I had was when I had to make my story into video footage. This was because I wasn’t particularly happy with the footage that I was getting, and being the perfectionist that I am, it was hard not to focus on the tiny details instead of the main ideas. The easiest option when filming, was to use the green screen and film your stuffy using this method. When I was using only the green screen, It felt like I couldn’t capture all that I wanted to. Then I decided it would be easier to just make animation. Little did I know that animation were really annoying to create when you have a time constraint, and it didn’t help that making one second of an animation took me like twenty minutes. It would also get on my nerves when the app I had been using would lag out every two seconds. I had lost my work several times while using it, RIP all the scenes that I worked so hard on but accidentally got deleted. Even with this, I made it through and finally finished it.

One thing that I haven’t yet touched bases on was the creation of my actual frankenstuffie, it is the name of the project after all. Like I have mentioned, the animal I picked to be the main focus of my video is a white tailed deer. A main component of this project was to take a stuffy version of the animal you chose, and cut it up. Then, I needed to add parts from another stuffy. In my video, a white tailed deer morphs into a deer wolf hybrid and has the legs, a tail, and teeth, of a grey wolf. Knowing this, I got both a deer and a wolf stuffy to recreate this hybrid from my story. I know what you’re thinking, a deer wolf hybrid? That’s not the slightest bit realistic! Let’s just say that we’re not being marked how believable it is. Well, I lied, that isn’t completely true.

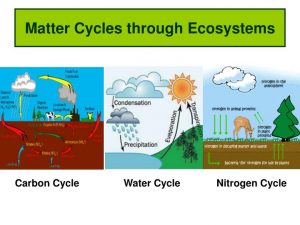
Yet another big section of this project was learning and incorporating the matter cycles. If you don’t already know of the matter cycles (nitrogen cycle, phosphorus cycle, carbon cycle, hydrogen cycle/ water cycle) then I suggest you click on this link and learn all about them. I was given the nitrogen cycle, and was tasked with finding some way that there could be a disturbance in that cycle. After giving it some thought and talking with the teacher, I decided that there would be a massive drought and that would be the disturbance. Without the rain, the nitrogen in the air would never reach the soil. Without the nitrogen in the soil, the plants couldn’t use it as food and they would die off. Because of the lack of plants, the deer would have no other option but to eat meat, like a wolf. And this worked perfectly for me because deer actually would actually become part wolf.

This project was quite challenging but also very fun. I have learned some valuable skills about time management in the process, and learned some new things like how to use a green screen and making animations. Although the end product didn’t turn out exactly as I hoped, I know that it’ll just make me want strive for better on all my other projects to come.

Calgary trip in a nutshell

The PLP program went on a trip to Calgary this year for one week, filled with everything you could possibly imagine. We saw wolfs, went to beautiful lakes, and visited some major historical sights. This is just the beginning. Below is a copy of the whole itinerary for the trip.

Since there is quite a lot on that list, I have chosen three of my favourite places from the trip to talk about. The first being the northern lights wolf centre. Located in Golden, Rocky Mountains B.C, the northern lights wolf centre is the place to go if you want to learn all about wolves. They promote a state of mind where the wolf isn’t always a scary, human eating beast like they show in movies such as the big bad wolf and little red riding hood. They are beautiful animals with a huge role to play in the environment. When me and my class visited the wolf centre, we had the great opportunity to learn about these amazing creatures, and even got to meet one of the wolves. It was all very exciting. I even got licked by a wolf, which was a once in a life time experience that I will never forget.

Next on the list is beaker head, a cool event which features interactive pieces of art that contain elements of science and engineering. These pieces of art are displayed throughout the city, each different and unique. My class walked around all of downtown Calgary looking at them. My personal favourite was the serpent mother, a huge metal snake skeleton that shoots fire out of its back. It was made by a group of ladies called the flaming lotus girls. They had a vision to make the big fire shooting metal snake using hydraulics, but not everyone thought that they had it in them or could actually go through with the task. Just looking at it, I think that it’s safe to say that they proved them wrong. The finished product was a true work of art. The tail of the serpent was wrapped around a big metal egg that opened up at the end of the night, revealing a liquid fuel effect that shoots coloured flames 50 feet up into the air.

For the very last example, I chose the enchanted forest. My class visited the forest at the end of our trip, and were asked to make a movie using the magical setting of the place. The story could be anything we wanted, it just has to take place in the enchanted forest. My group members were Lauren, Maggie, and Robin. Together we came up with a story about two girls who broke into the park after hours and were being too loud. They ended up getting trapped inside the characters that were on display, by a witch that inhabited the park. Now, they can come out after hours but are only able to stay in the park. They end up teaming up with a guy that was wondering around the park, and all decide to trap the witch and finally escape. It was a very fun movie to make and edit, and it brought me closer with friends that I wouldn’t normally hang out with all they much before. Although the movie wasn’t perfect, I liked creating it and had a fun time filming and putting it all together. But, If I were to redo this project, I would’ve definitely fixed the transitions and audio a bit more.

Although those three things were my favourite, they were just the tip of the iceberg. We saw and did so much more. With that being said, these three were things that were, in my opinion, the most memorable, and I hope you enjoyed hearing about them.