Blue Sky 2: Electric Boogaloo

Blue sky has come and gone, and its almost the end of the year. Do I need to remind you of the rules of blue sky or should I just link you to my previous post?

This year, I made something I’m really proud of. I made the SleepyMcSleepwell, an inflatable pillow. the idea was to help with many kinds of sleep problems. I know pillows already do this, but i combined a whole bunch of ideas into one (or two, i didn’t have time to connect them). They’re inflatable so you can have whatever firmness of pillow you want. If you want a firmer pillow you can. If you want a softer pillow, you can.

DRAFT 1

Draft one was a simple drawing. You can see that the head pillow has a divot or valley for your head. Your head goes in the valley, and the valley walls support your neck. If you didn’t want/need a neck pillow, you could just flip it over and have a regular pillow. Attached to the side is a body pillow if you’re a side sleeper like me. Resting against the body pillow helps with spinal alignment, and is just more comfortable.

DRAFT 2

This is just a proof of concept for the head pillow, and its not very good. I took a bike inner tube and stitched fabric around it. The point was to get an idea of what I could do for DRAFT 3.  For the head pillow, a bike tire might have worked, but I certainly wouldn’t have worked for the body length pillow. Having 4-5 bike tires all needing to be separately inflated would have been bad.

DRAFT 3

For draft 3 my dad found some heat-sealing plastic that we used to make the bladders. We just used a waxing iron to seal the plastic, and we made chambers so the pillow didn’t bulge out as much. At first, we had problems with the seal around the valve not holding. The valve was made of a different kind of plastic, and the glue stuck to either one or the other. So we taped it. After the chambers had been made, we wrapped some pillow material around the chambers, sewed it to itself, and put the two pillows in a pillow case. 

EXHIBITION DAY

For exhibition day, we were put into 6 groups based on the grade 10’s projects. I was in the Physical Health Group, and we were in the PLP room. We had two sections, physical activity and medical, and I was in the medical section.

INTERVIEW

We all had to get an interview with a person who knew a lot about our topic. I got an interview with a woman named Denise james, a friend of my aunts who works at sleep country Canada. Admittedly, I sent her the email a bit late, but thankfully I got a reply the next day. 

(Photo)

(Photo)

(Photo)

During this project I learned a lot about two things; time management and building with less than ideal materials. This project should have been assigned a week or two earlier, or spent less time on stuff that was unnecessary to the actual project. Because we had much more limited time, I needed to work on blue sky for a couple hours each day. The materials didn’t help much either. Building a pillow with packaging plastic? Ridiculous for anybody not in PLP. Or maybe im crazy an there was a much better way to do it. 

Reil-ly Cool book

Have you heard of the man who fought for the Metis? Do you even know what a Metis is? If you answered yes to either of those questions, you should still read this post. 

“Metis” is a french word meaning mixed, and if you are/were a Metis, that means you have both european and First Nations blood. The most well known Metis settlement was the Red River, which became Winnipeg. 

A man named Louis Riel was born in the settlement in 1844. He became a controversial politician, as he thought the rights of the Metis people weren’t being respected. A lot of Metis supported him, but the Canadians (he started fighting after confederation) thought of him as a megalomaniac and a murderer leading a group of savages. 

But how did he get so controversial? We read a comic strip biography about his life. The author had to leave out some details, but he kept all the important events. In the book the first major event was when Riel accused a man of being a spy. The man was able to escape, before being caught a brutally killed by Thomas Scott. Thomas was arrested, and held in fort Garry. If anyone was insane, it’d be Thomas. Staying up all night screaming insults and swears at the Metis and First Nations guards. It was so bad his cell mates asked for him to be moved to a different cell. 

After a while, the guards asked Riel if they could execute Thomas. Riel was reluctant at first, but he eventually agreed to Thomas’ execution. Through local newspaper the event eventually got to Canada, and a new newspaper was printed. Because the news can and will bias towards their side, important details were “forgotten” and Riel was deemed a villain. 

Through a large snowball of events, Canadian soldiers decided to invade the area. Riel and his men defended, but were still called the villains because the “killed hundreds of brave Canadian soldiers” even though the Canadians invaded their land and the Metis were defending it.

Riel saw that too many people were dying to either protect him or kill him, so he turned himself in.

https://youtu.be/Vj8MvHrRPGU

Even then, people were still trying to defend him. After 13 days of trial, the judge decided he was guilty of high treason. He was transported to Saskatchewan to be hanged so the Metis couldn’t defend him as easily. 

But was he the villain? Well, I don’t think so. Sure, he did order the execution of Thomas Scott. But Thomas wasn’t innocent. He killed a man, and committed treason, so execution seemed like a reasonable punishment (not by todays standards though). The media portrayed Thomas as an innocent man, but he got the justice he deserved. The Canadian government wanted an excuse to take control over the settlement. 

Despite all Riel went through, he used his power to make his voice heard, and he still has an impact on Winnipeg today. Just like Richard Clement Moody, the man I made an animation about for my last project. We were tasked with making a short animation about a person or group of people who used their power to influence Canada in some way. This person had to be before WWI, and west of Ontario. 

Richard Clement Moody

I wanted to do the person who created Vancouver, and I thought that Captain George Vancouver was that man. Vancouver island was settled before Vancouver, and the island is named after him. But after doing some research, I found that Richard Clement Moody first settled in the Vancouver area. 

Captain George Vancouver

First off, why Moody? Well, Moody was promoted to a Major-General of a group of Royal Engineers, the British Columbia Detachment, to be exact. Their goal was to create a settlement on the border of the US to claim the Fraser Gold Fields for Canada. 

The group planned to go to Victoria, then travel to the mainland. Along the way, the Royal Engineers, British Columbia Detachment picked up people who wanted to travel with them. The REBCD brought them along to Victoria, until Moody arrived with his family. They traveled to the mainland, and created a settlement along the Fraser River. Moody named this settlement New Westminster. 

Because the gold rush doesn’t happen for the next couple years, New Westminster was small, and not much happened for the first year. That is, until the merchants went to Moody asking for a trail from New Westminster to Burrard inlet. This would allow for easier trade between New Westminster and other cities. Moody had a very military-centric mind, so he saw the trail as a boost to military and navy, so he built it. He named it Kingsway, and it still exists today.

New Westminster was still small, even after the gold rush. Until the CPR was planned to end in New Westminster. Many new workers came in beginning the long, treacherous build of a railway from New Westminster eastern, through the Rocky Mountains. New Westminster gained a huge boost of population, and workers moved there with their families. They were all exited to finish the largest transcontinental railway at the time.

In the video, I mainly used an app called FlipaClip, a fun animation app. For transitions and characters moving across the screen, I used magic moves in Keynote. At the beginning, I had my friends Jamie Ball and Kiefer Hogg to help with the live action part. In it, Jamie asks me who created vancouver. I begin to tell him, and the animation begins. 

https://youtu.be/k-ZNtGHwuvk

I learned a lot about animation during this project. I learned that hand drawing is really slow, and I wasn’t even drawing with much detail. Magic moves is a lot faster, but doesn’t look as good in my opinion. If I ever need to animate something again, I’ll have to see how long I have, an the quality I want the video to be. 

Correlation and Causation

With a countdown song in the back of my head, we had one final project for math and science; correlation vs causation.

For those who don’t know, multiple data points have correlation when they have a similar trend and are caused by a similar underlying thing. An example would be ice cream sales and bike sales increasing during the summer. Both increase due to better, warmer weather.


Causation is when one point of data directly impacts another. When those bike sales increase, more people ride bikes. If there are more bikes on the road, trail, whatever, more bike tires will pop. The increase in tires popped is causes by an increase in bike ridden per day.

With Robin, we made a video talking about correlation vs causation. We used those exact examples, and two more we had to find ourselves. We looked at both arm span and height, and population size and life expectancy.

https://youtu.be/zyd5gfd0IVo

First was arm span vs height. We got data from both our classmates and data online. But how do you measure something like this? Well, from a previous experiment, we knew the height of our test subjects in CM, and we could get the arm span easily. We had the test subjects hold the meter stick in one hand WITHOUT compromising the test, and put another stick against the end of the first. Where the tip of the middle finger was is the length of your arm span. After this test we found that the average arm span was about 1-2 centimeters longer than the average height. So yes, there is a correlation between the two.

Next up; something I wasn’t expecting. But before that, the causation section. We chose to find a causation between the population of a country and the life expectancy of that country. We went to a website called Gapminder to find our data. Gapminder has a whole bunch of data from population to country age to the amount of people who have access to a computer. We found what we’re looking for.

We were expecting for life expectancy to decrease as population decreased. Not a lot, but as population increased, there would be less space for housing and farms, and the resources for the poor would decrease, thus they would die sooner. But we found the exact opposite. There are many reasons at play here, but we think that as population increases, more people Han improve the life expectancy by helping out with food, sharing resources and more. In turn, the population increases as life expectancy increases, because more people are alive at one time.

Correlation and causation are in our daily lives, but we barely notice them. These were just a couple examples of correlations and causations. Some have obvious reasons for existing, but you may have to dig deep to find the reasons for others.


Rise of the Attack of the Planet of the Cloned Blackberry Army

When you think of cloning, what do you think of? Maybe creating an entire army from one guy’s DNA? Perhaps growing expendable soldiers to use for your evil takeover! Or maybe not. You probably don’t think of cutting a branch off a plant, replanting said branch, and getting said branch to grow. But that’s exactly. What. We did. *evil laugh* *thunder and lightning*

I was part of a team of scientist who grew multiple plants from just one plant. My colleagues were Kailey, Jessie, and Logan. Those three were in charge of growing dandelions, and I was in charge of blackberries. I don’t know much about the dandelions, so go check out either Kailey, Jessie, or Logan’s posts about those. But I do know about the blackberries.

So, I have a cool kind of blackberry at my house (and the ones we cloned). I did some research, and I found that they are in fact a sub-species of blackberry, called a Marionberry. They are man-made genetically-altered blackberry with no thorns, bigger and sweeter berries, and more specific growing conditions. All this time and I had no idea.

Our team chose blackberries because of how easily they can clone themselves. When a blackberry branch is in contact with dirt for long enough, it will begin to grow roots. The branch doesn’t have to be connected to the original branch to grow roots, but it grows them a lot better if it is.

Unfortunately, of the three plants we planted, only one grew. This one was already nicely growing when we planted it, so it’s not surprising that it grew well. The other two didn’t. One of the plants had also rooted, but it died because its leaves were too small to get enough sunlight. The one that didn’t have roots died for one or a combination of these three reasons;
I overwatered it
It didn’t have big enough leaves to get enough sunlight
It didn’t grow roots fast enough to get nutrients from the soil

During these 1.5 months we were documenting the growth of both our blackberries and our dandelions. We then made a video explaining what we did, why reproducing plants this way works, and why reproducing plants this way is good. I was also in charge of the blackberry section of the video. In the video I explain the last two paragraphs, with a stop-motion animation of what I’m saying.

(Can I drop the scientist act?) [yes.] (ok thanks.) As with most other science and math projects, I didn’t learn much about teamwork, time management, any of those “life skill” things. I mostly just learned about the unit and worked by myself, which is why my section is much different than the other sections. I guess i learned more about video creation techniques, but I’ve been told we shouldn’t be focusing on those when talking about our learning. Now if you’ll excuse me, I need to take over the earth with my genetically perfect blackberries.

USS Tacoma Rescue

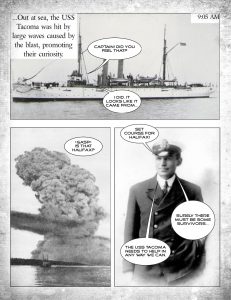
For the last month and a half, we’ve been working on our WWI unit. Our project was to create a comic book with each chapter being a specific event, person, or thing during the war.

But first, a recap. WWI took place from 1914-1918 between different European countries. The Allies (France, Britain, Canada, America, Russia, and Italy) were against the Central Powers (Germany, Austria-Hungary, the Ottoman Empire, and Bulgaria).

The war was started by the assassination of Arch-Duke Franz Ferdinand by a Serbian man. Germany invaded Serbia, and Britain gave Germany 24 hours to stop invading Serbia. When they didn’t comply, Britain declared war on Germany. Because Canada still a dominion of Britain at that time, so they were automatically at war as well.


We started this unit right before spring break, so we didnt do much for the first week. We did have to read a book about WWI over spring break. We got to choose between three books, War Horse, Private Peaceful, or Generals Die in Bed. I chose Private Peaceful, which is a book about two brothers who join the British military at the beginning of the war. After we got back from spring break, we made a book report. I say make, because we could have drawn it if we wanted to. I did, and i drew a very powerful scene from the book. I drew the two brothers getting on the train to (spoiler warning) leave their small town to join the army.

Now then, the juicy part of the unit; our main project. Each person in the class chose a topic to research. Some chose Passchendaele, others chose Vimy ridge, and Jessie and I chose the Halifax Explosion. We split the event into two parts, and did one of said parts. Jessie did before the explosion, and I did after.

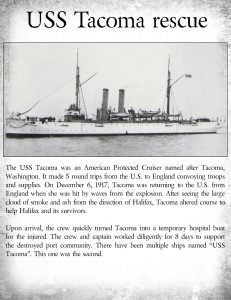
We also had a story about a person or group of people that relates to our event. Jessie looked at Vincent Coleman, a man who sent a telegram to an oncoming train, warning it of the explosion. I wrote about the USS Tacoma, a transport ship that had been used as a temporary hospital ship for the survivors of the explosion.

During this project, I learned some valuable teamwork skills. I was able to work with Jessie to create a fluent story, without having to work with her directly. I think that kind of teamwork is good to have, because you’re able to work as a group, but also by yourself.

What are, like, terms?

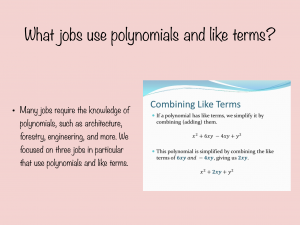
During the last couple weeks, we have been learning about combining like terms and polynomials in math class. We then had to design and present a driving question that could be whatever we wanted, and we worked on these projects in groups of 2. I was with Kailey, and we chose to look at how combining like terms and polynomials are used in the work force.

But first, a question my mom had. “What are like terms and polynomials?” Polynomials are any mathematical equation that has;
1 or more terms (parts that are separated by either an addition or subtraction symbol)
Variables
Exponents
Every equation is a polynomial, except ones that have something in them that makes them not a polynomial. For example;
dividing a variable
Negative exponents
Even just “1” is a polynomial, despite not having an exponent of variable. Remember, an exponent and a variable can be whatever you want them to be, so you could write it as “1y^1”. Y is 1, so its “ 1 Times y^1”.

Like terms are any term that have the same variable and exponent. For example;
1x, 5x
2ab, 7ab
4y^3, 8y^3
Also, if a term has multiple variables, like 2ab, it doesn’t matter which order the letters are in. You can combine terms like:
2ab, 3ba
5efx, 8fex, 7xfe, 11xef
The following are NOT like terms;
2y, 3x
4ab, 3a, 7b

Now then, the project itself. We chose to look at the usage of polynomials and combining like terms in the work force. We chose three different jobs that use combining like terms, stuck them on a slide show, and presented it to the class. The three jobs are Economists, Foresters, and Engineers. And before you leave a comment saying “umm, actually, there is a large range of different engineering jobs, just saying ‘engineering’ isn’t enough.”, we talked about how all engineers use like terms, not just one type.

I probably shouldn’t be saying this, but I don’t think I did enough work on the presentation. Kailey was the one who put the slide show together, and the one who wrote the script. All I did was some lacklustre research and some final edits. For the rest of my projects, I want to be helping out as much as I can, so I don’t feel as guilty as I do with this one.

I’m upset about the research too, I searched for a couple hours, and couldn’t find much about how foresters used like terms. All I could find was that foresters use them to calculate the amount of trees they need to replant after cutting down a section of forest.


(Insert witty pun here)

DI Regionals have come and gone, and its time to reflect. My post last year goes into more detail, but Destination Imagination is a tournament in which teams in different skill levels create a solution to a challenge. We then present these solutions to the Appraisers who judge us based on numerous factors. This year, I did the engineering challenge again, called Drop Zone.

Our challenge was to build a structure that is meant to support weight that is dropped onto it. We then need to create a presentation around that structure. We also had to have an Event depicter, which was a visual or auditory depiction of a Sudden event in the story. My Team was Myself, Luca J., Logan, Robin, and Isabelle. We were a Senior Level (SL) team, called The Droplets.

We all participated in the solution in different ways. Robin built the event depictor, which was a seismograph. Luca and Isabelle made the backdrop, which was a canvas that opened, revealing a science lab and a forest-y alternate dimension. Logan helped with a little bit of everything, but mostly helped with the design of different things and props. And I built the structure.

I built the structure out of Balsa wood and wood glue. At first, we were having trouble with the design, but I came up with a solution; Mortise and Tenon joints. A mortise is a cut hole or grove in something, usually wood for furniture. The Tenon is the reverse, and piece of wood that sticks out and fits into the mortise. After the mortise and tenon are tight, the carpenter glues the together.

Making these weren’t super difficult. I couldn’t use power tools, because they would just chew up the wood, so i used an exact-o knife. Using one wasn’t difficult, it was just tedious as there were a lot of them to make. 16 mortises and 16 tenons.

Next, I added supports. I didn’t mortise and tenon them, because that would be too difficult. Instead, I used something called a butt joint. Weird spelling, i know. These were put in the middle of each face, with two others butt jointed at an angle on each side.

Next, I added the final pieces: gussets. These triangular shaped pieces were glued onto the sides of the joints to add extra stability and support. At this point, the structure has very little weakness. The gussets make it more difficult for the structure to “parallelogram”, or slant sideways.

This isn’t the only design for a gusset, this is just one, and the style I used.

REGIONALS

Regionals were here at Seycove, so we had a home team advantage. What that advantage was, I have no idea.

Our presentation was about a seismologist named Dr. Underwood who was studying the effects of damage to tectonic plates. He created a pocket dimension with our other main characters in them. The other characters we called the “Droplets”, played by Robin, Luca and Isabelle. I was the teacher showing the documentary to the students (audience). I was also the backstage special effects guy.

Dr. Underwood created a pocket dimension, and placed the droplets in said dimension. After some exposition, he began dropping the weights onto our structure. Our structure represented the tectonic plates under the droplets dimension. This began a series on natural disasters, in which the droplets responded with a comedic twist to all but the last one. During the first disaster, a rockslide, robin got hit with a rock, and had to pretend to be injured. In the second, a tsunami came, and none of the droplets were able to swim. During the last, and actual earthquake, the droplets were freaking out. Unfortunately, I couldn’t get earthquake sounds to play loudly enough to be heard. I did have them playing, but no one could hear them.

(video here)

PROVINCIALS

Provincials were similar, but at Johnston Heights instead of Seycove. We had the same story, same structure, same costumes, and the same problem with the earthquake sounds. We did have improvements, however. Because I was behind the backdrop, I couldn’t see how many weights Logan had dropped, so my team had to queue me in. They had very specific lines they were supposed to say, and we practiced it until they new all of their queues. Unfortunately, the volunteers had to destroy my structure both times to make sure I wasn’t cheating. I have a video of them destroying the second one.

INSTANT CHALLENGES
We also had instant challenges, challenges we didn’t know anything about until we got there. Unfortunately, I legally can’t talk about them, so enjoy this nice picture of some flowers instead.

During this multi-month event, I learned more about working together as a team. Speaking of which, we worked really well. We all did our own thing, working on a single part of the presentation. But we were able to combine it all together really well, which is something I was both expecting to happen, but I doubted it would.
As with last year, I certainly wouldn’t want to do it again, but it wasn’t unenjoyable. It could have been more fun, but then it wouldn’t be a challenge.

Long in the future in a galaxy exactly like this one…

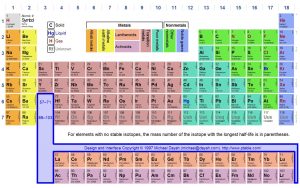
This term in science we’ve been learning about chemistry and the periodic table. We learned about atoms, electrons, protons and neutrons, stuff like that. For our project, we made an animated video about atoms, ionic, and covalent bonds.

We learned a couple different things that I’m gonna list of in point form;

1. Valence shell: the outermost layer of an atom and their electrons. Having a full valence shell make the atom perfectly stable.

2. Ionic bonds: when multiple atoms trade electrons so all members gain a full valence shell. This causes each atom to become either positively charged if they loose and electron, on negatively charged if they gain it. The opposite charges attract one another, causing them to stick.

3. Covalent Bond: when multiple atoms want the same atom(s), so they share it to gain a full valence shell. As neither atom looses or gains an electron, the both stay neutrally charged. Because they are sharing, they stick together.

So, about the assignment.

I was with Kiefer, and we had to animate a video about covalent and ionic bonding, we could choose any atoms we want, but we were told to use a specific family. We used the first couple elements within the “Alkaline-Earth Metals” family, and oxygen.

Calcium and Strontium can’t bond with each other, but they can bond with oxygen, so oxygen was the main character.

One of the requirements was that the video needed to be personalized and unique. While all the other groups had their atoms as characters in their own element-universe where each person was a single atom, the atoms in our story were large masses of pure elements.

Each atom has a different power, and bonding shares these powers between them. Oxygen can talk in any language, calcium can build and repair any machine, Etc.

In our video, humans encounter alien life, the aliens are the atoms. The atoms need to fix their ship, but oxygen is the only atom that can communicate to the humans, so he bonds to calcium so he knows what’s wrong with the ship and can talk to the humans. Because the humans are humans, they capture another oxygen and strontium to study them. Unfortunately, strontium is really strong, and they breakout of the jail cell. They leave the humans with their newly fixed ship, and the humans get what they deserve.

During this project, I learned a lot about the (agonizing slow) process of animating. It took about 10 minutes per frame, and this was a stop motion video. I also learned about ionic and covalent bonds, atoms, elements, and chemistry. While it was boring at times, it was interesting and probably very useful in the future.

At the beginning of this unit, I made a mind map of what I knew about chemistry. I didn’t know a lot, so my mind map was pretty small.

I made another mind map at the end of the unit. I had greatly improved, and the map was much bigger.
Charts and graphs and magicness

In my math class recently, we’ve been learning about linear equations. You know, Y = mb = X.
We did some classes just learning about them, the we started our project. We were given 10,000 fictional dollars for a US road trip. We started in New York City, and could go anywhere we wanted. We only had a few parameters to meet. We had to spend at least $9,500, and we had to be able to get to and from our destination by car.

We had a few sheets we had to fill out, and on that sheet we had a few limitations. Limitations like the car we could use, the baggage we could have, the expensiveness of the hotels we could stay in, stuff like that.

We started with the expenses of food, bagging, and lodging. Because I wanted the most luxurious trip, I went with the most expensive of each, with food being $200 per day, lodging being $500 per day, and bagging being $300 per person. Because im the only person, bagging was a straight $300. So, lets add this up. Y = ($200 + $500 =$700) D + $300.

Now, we need the start and end locations. I chose Trump Tower in New York. After, I didn’t know where to end, so I chose a random number (for the address) and a random city in the States. Well, it turns out that “33876 Chicago – Kansas City Expy, Good Hope, IL 61438, USA“ is quite literally the side of a highway. I was then given an interesting question. If I could only drive for 10 hours a day, it would take 4 days. Then, if my trip took 31 days, I would drive for 1 hour a day.

Part 3: vehicle expenses
Again, I want a luxurious trip, so I went with the most expensive car I could, the Lamborghini.
The lambo costs $160 per day, so we can add 160 to our 700, making it $860. To find the gas cost and mileage, I had to take the total distance (34 miles) and divided that by the MPG of the lambo (13). I got 2.6, or 2.6 gallons of gas. Those numbers mean nothing to me, so lets metric them. 34 miles become 57 km, and 2.6 gallons becomes 9.7 litres. At $2.80 per gallon, im paying an additional $7.28.

During this project, we encountered “the Speeding Cyclist”, a crazed maniac biking faster than the speed limit. I had to calculate how fast he was going, and answer some questions about how fast he was going, and where he might be hiding. For completing all of the questions, I was given and extra $8,000 to spend on my trip. This brings the amount I have to spend up to $17,500.

Now, we have to calculate the cost over 1, 2, 3, and 4, weeks right now, we have “Y=$860d+$307.28” Y is the total cost, and d is the total days. Remember, I have to spend AT LEAST $17,000. From the photo below, 1 and 2 weeks are too short, and 3 weeks is to long. So on the next page, I found an exact amount of days that would work.
I thought that something in between 14 and 21 days would, so i found the cost of 17 days. I still had plenty of money left over, so I found the cost of 20 days, and after that, I only had about $500 left. Perfect! A 20 day trip from Trump Tower to a Kansas City highway and back.

Now, here’s something I wasn’t prepared for: sponsorships. Three different companies, Coca Cola, Pepsi, and Snapple, were willing to provide money for having their products appear during my trip. While none of their sponsorships would give me enough money to extend my trip, I did calculate when each sponsorship would provide me with the best money-day ratio.

So for a recap, we had to plan out the costs for a roadtrip across America. We had $10,000 to spend, and got more from the Speeding Cyclist. I went on the most luxurious trip I could from trump tower to a highway in Kansas and back. After spending $17,500 on my trip, I get the option for a sponsorship to try and extend my trip, but none of the sponsorships actually extend my trip.

The Beaver Wars

This years first project is pretty fun sounding. Our class was put into groups of 4 students, and we are making our own video. The video is a “Heritage Minute”, or a one minute video about a person, place, event, or invention during Canada’s history. My group consists of Emily, Jessie, Lauren, and myself. We chose to do a video on the Fur Trade, or more specifically the Beaver Wars.

Beaver Wars! (Semi-inaccurate picture)

But first, some backstory. We’ve been studying Canada while it was still a British nation before Confederation. The topic of our video had to occur sometime during the 1700’s to confederation in 1867. Our topic does take place during the 1600’s, but the wars had long lasting effects on fur trade throughout the 1700’s.

The Beaver Wars were a series of raids, battles, and other events between 1610-1701. These battles were fought intermittently between the native Iroquois tribes and the European settlers. Most of the time, the Iroquois would raid small villages and settlements during the night.

In our video, the main character Louis is running to his house to warn his family of the raid. As he’s running around his home grabbing supplies, explosions and gunshots can be heard in the background. After running out with his family, his wife gets worried the furs are slowing them down. Louis dislikes the idea of dropping them, as their worth a lot of money. His wife convinces him to drop the furs, just as their house and village burns down. We then switch to Louis’s great great grandson holding a picture of an older Louis. The Grandson flips the photo around, and on the back it reads “my great great grandfather, Louis”.

https://youtu.be/yZEJ30fHicI

We had plenty of other shots we didn’t use. One shot that I thought was really cool was of the fur pelt I was holding. It had been dropped on the ground, and an arrow hit it, lighting it on fire. Unfortunately, the arrow was actually just a stick, so it didn’t get stuck in the fur like we had wanted. It also didn’t have a pointy tip, so you could easily tell it was fake.

I was actually in two heritage minutes. The one above and one for Kiefer’s group. I was a soldier in Kiefer’s Redcoat Army. Kiefer actually used an interesting filming technique where he took multiple videos of us (me and Robin) in different locations with the camera in the same spot. He then layered the videos so it looked like there were more people. It was really funny to see an army of me and robin take over a church.

This project didn’t teach me as many organization skills or teamwork skills as another project might. This project just taught me the same things you may read in a text book. Although we did get to chose our own topics and a subtopic with that topic, so my group would know different facts compared to another group.