My Vibrant Videos!

Hello, Im Theryn Strobl, and I am excited to write to you about a recent maker project, and in my opinion, the best PLP project I have participated in. In this project, I learned lots of filmmaking history and techniques on my journey to learn more about the movies! So, without further ado, here is the post.

We began this project with some brainstorming, a small lecture n some history of filmmaking, and then we were assigned a video about a hobby or skill we have. Being an avid snowboarder, I chose to make my video about that. The video contained some posters, a beginning, middle, end, and music. It was edited in an app called Clips, which I personally think is a very bad software, especially in comparison to its free counterpart, iMovie. But nevertheless, here is my final video:

A Story About Me!

The next day, we moved onto skill #2: a silent movie. This movie was supposed to recreate an old black and white movie, with no sound (other than a soundtrack) and not to long, making use of a certain poster (it’s the old-timey looking one). I made mine about finding the last lego peice in my contraption, and I think I conveyed the story using the limited storytelling options quite well.

The Last Piece

The next product in our moviemaking journey was a tutorial video that teaches how to do something. In the end, most of them were goofy and taught a very basic skill, but they could still do their desired job, so thats a win. In my group were Dana and Brooke. So, for the first step, we got started on our storyboard, which went through many painful revisions until we got it approved.

Then, we filmed and edited our final video.

How To Tie Your Shoe

And then, for the last and most fun skill, we were put into groups of three, and givin around two hours to make a short “special effects sequence”. The goal of this was to use special effects to help tell our story. We had some preparation beforehand to figure out a story and plot, but everything else had to be finished in the allotted time. This was also in a small group, and I was with Fraser and Nolan. So, we set to work designing a quick storyboard, and then got to filming. We filmed many takes, and got quite the blooper reel, but in the end, this was our film:

The All Great Magical iPad Heist

Then the entire class shared their videos in a mini film festival. An honourable mention of mine is this video:

Overall, this was probably one of my favourite PLP projects ever, and I actually enjoyed learning how to communicate using the medium of film, and creating truly vibrant video.

Thanks for reading my post! Make sure to stay tuned for the next one, I’ll see you later. Bye.

Rube Goldberg was a cool guy.

in the latest Scimatics project we created Rube Goldberg machines to represent the scientific method. The scientific method consists of 6 steps: observation, question, hypothesis, analysis, conclusion. So, without further ado, here is the post.

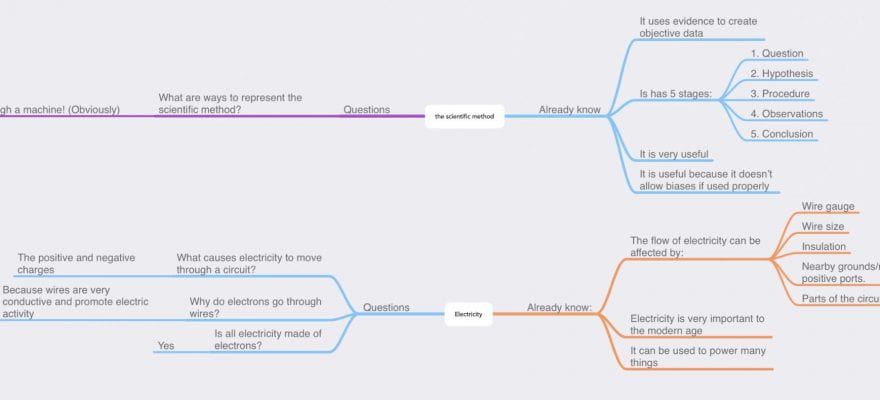
I wasn’t here for the first couple days of this project, but as always, we started off with a mind map of what we knew already and questions we had. The next step was to perform some experiments on electricity.

After this we did some workbooks and a khan academy quiz that helped me understand how electricity works in a circuit. Then, we created individual diagrams of what our Rube Goldberg machine could look like. Here is mine:

First draft blueprint

Then, my group of Colton, Cale, and Max got to work on our final blueprint, which is a scale drawing of our machine, a digital drawing, and circuit diagrams and calculations. We also built our machine. Here is the final video:

And the final circuit and machine diagrams:

Final blueprint
Circuit Diagram

And for the revised mind map containing all my new knowledge:

Now, for the curricular competencies:

Questioning and Predicting: Demonstrate a sustained intellectual curiosity about a scientific topic or problem of personal interest

All class time is used efficiently for learning without distractions

I think that I used all my class time very well this project, seeing as I was away for most of it and still learned so much and got everything done

Reasoning and Analyzing: Estimate reasonably

Final blueprint is complete and accurate. Contains grid scale. All measurements are labeled with a high degree of accuracy. All lines are easily distinguished

My team’s final blueprint does contain a grid scale, measurements, and is very accurate

Planning and conducting: Select and use appropriate equipment, including digital technologies, to systematically and accurately collect and record data

Hand built series and parallel circuits are used to good effect with efficiency in your metaphor machine. Accurate circuit diagrams are included in the final blueprint. Diagrams use proper symbols. Diagrams are neat and easy to understand. Measurements of current, voltage and resistance are included

There is one series circuit in our machine, the one that lights up the question mark, and all the circuits combine make one large parallel circuit. Their are accurate diagrams of alt eh electronics in our machine in the final blueprint, accompanied by voltage, current, and resistance measurements

Scientific Communication: Formulate physical or mental models to describe a phenomenon

A video is recorded of the complete operation of the machine and voice overs are added which explain the sequence of the scientific method as the machine progresses.

I think that our final video is emerging, because the voiceovers do not sync up, and they do not explain what is happening very well. Also, the video only utilizes one of four videos of the machine working, it much less immersive.

Thanks for reading my post! Once again, thanks to my group for helping me in this project! This project was probably my favourite Scimatics project this year, so I hope to see more like it in the future. See you in the next one.

Correlation Vs. Causation

As of two days ago when writing this, the latest PLP project just ended. I am writing today about that project, the correlation and causation project. in this project, I learned how to identify correlation and causation, and make surveys and show the results. So, without further ado, here is the post.

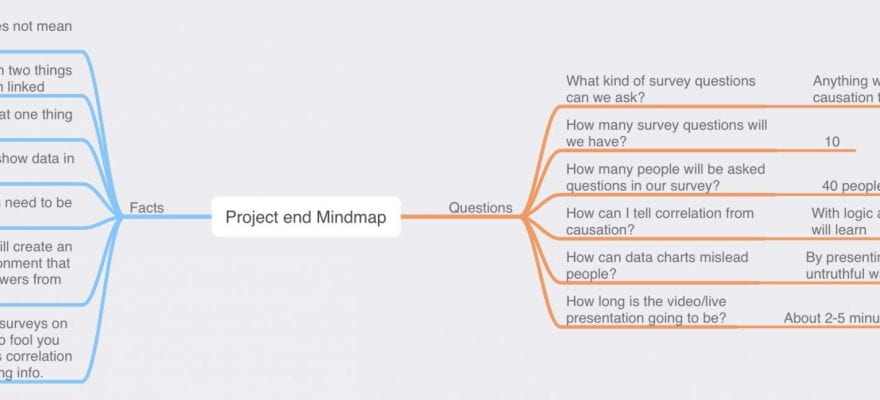
To kick off this project, I started the same way I usually do: with a mind map. This Mindmap graphs all the existing knowleadge I have and the question I have onto paper (or pixels).

This project was about correlation and causation. Correlation is a statistical term that evaluated the degree at which two or more things are related. Causation is when those things actually cause eachother.

The final product of this project is a presentation featuring survey results on graphs that show correlation and causation. For the next major milestone in this project, me and my partner had to make a plan for our survey. We had some ideas for what our survey could be, and in the end we made this:

After making this, we assembled and wrote the questions into a survey we made using google forms. We sent this form our via Basecamp, Snapchat, and iMessage. We received 40 responses in total, all of which are 13-18 years olds. We put our results onto graphs, and found no correlation with our original plan. But, we didn’t just ask four questions, we asked more so that we could look through the data to find correlations (almost) no matter what. And with that, we found these two correlations:

Correlation 1: Friend height VS. Your height
Correlation 2: Perceived height VS. Actual height

Finally, it was time to start working on our final presentation. We started out with an outline of what our presentation would look like

And after that, we made out final presentation, and nothing to notable happened with this.

And then we presented. The presentation went smoothly, though I think we could’ve improved upon it by making our data more clear.

And for the curricular competencies for this project:

Planning and conducting:Select and use appropriate equipment, including digital technologies, to systematically and accurately collect and record data


Two correlations are found using well crafted survey results. The survey results and correlations are are displayed and explained through presentation software. At least two graphs are analyzed to confirm correlation.

Our presentation clearly showed our survey results, correlations and featured two graphs

Communicating and Representing: Use mathematical vocabulary and language to contribute to mathematical discussions

Verbal and pictorial explanations help the audience to understand the circumstances where both correlation and causation are present, and also where a correlation is falsely associated with causation. A Logical explanation for causation is explored for one case.

We showed our exploration into one of the correlations to prove causation which follows a logical course. We also have verbal and pictorial explanations that help guide the audience to a conclusion.

Applying and Innovating: Contribute to care for self, others, community, and world through individual or collaborative approaches

Good ethics are followed when conducting surveys. All class time is used efficiently for learning without distractions.

I used my time wisely and only missed one deadline this whole project.

Well, thanks for reading my post, and I hope you enjoyed it. Stay tuned for the next one.

My partners Max’s blog

Don’t Eat Rat Feces!

Today, I am writing a summative post about my latest, and last project of the year. This project is called Comic Cells. I learned a ton from this project, from what subsequent endocytosis is to why you shouldn’t eat rat poo. So, without further ado, here is the post.

As with all scimatics projects, we started off the project with a mind map of existing knowledge, question, sources, and anything else about the topic. Here is mine:

Project Start Mind Map

For the second milestone of the project, I created a wanted poster for a disease containing the date of discovery, how it affects cells, it’s mortality rate, and more.

Typhoid Wanted Poster

Then I started working on a storyboard to guide the making of my comic. The storyboard was a very rough guide to the comic, and some parts were not even in the final comic.

Rough Storyboard

Then I started to research a TON of facts about the virus I chose. (Hantavirus) To read more about hantavirus, veiw the sources down below. I learned a ton about cellular processes, and then started drawing pictures for my comic. I am not the best at drawing, so this was a hard task for me. However, I a very proud of the final comic, which is the namesake for this post.

And, as with all projects, there were core competencies I worked towards throughout the project. They are:

1. Questioning and predicting: Demonstrate a sustained curiosity about a scientific topic or problem of personal interest.

All class time is used for learning and creating a comic book story about cellular processes and/or diseases. I think I used almost all of my class time efficiently, but even so I still think I could’ve worked slightly faster in class and had less homework after school. But it worked out in the end, which is good.

2. Scientific communication: communicate ideas, findings, and solutions to problems using scientific language, representations, and digital technologies

Correct vocabulary and accurate diagrams are used. At least 10 interesting science vocabulary words are included in the story. I used more than ten science words in my Story, and I think my diagrams are concise and accurate at what they represent.

Evaluating: Demonstrate an understanding and appreciation of evidence

Cell/bacteria/virus characters interact in a scientific way. Symptoms and logical outcomes of the chosen disease/cellular/ body process are integrated into the story. In my story, the reaction to the virus is realistic to real-life cases, and the outcomes are on the probable side.

Sources:

Source 1

Source 2

Source 3

Source 4

Source 5

Source 6

Source 7

Thanks for making it this far. If you liked this post, make sure to check my other ones here. See you in the next post! Bye.

Snowboard bindings

Do you want a new pair of bindings? Do you not know what to buy? Well, you came to the right(ish) place, because I (kind of) know about it! Without further delay here are three tips about what bindings to buy!

1. Stiffness

When buying bindings, you must make sure that they are not to flimsy for your board. For example, if your board is 175+mm wide, flexible bindings will make the board feel sluggish with poor edge control. Here is a great video.

2. Straps

bindings have all sorts of straps, and these can make a large impact on your riding experience massively. First, it is best to have a toe cup. A toe cup is a type of strap that rests on the front/top of your boot, rather than just the top. 

For example, in this picture, the toe strap cups the toe,


and in this picture, the strap goes on top of the toe


Toe cups are great because they hold your foot in much tighter and in turn make the binding stiffer.

3. Locking method

different bindings have different ways of locking your boot in, and some are better for some things than others. For example, Burton step-ins are great for almost everything, but aren’t as robust in deep snow (and cost a fortune). In-depth binding guide here.

thats all for today, but here are some credible websites if you need more information.

Breakdown of binding angles here

Different binding types here