My Poetry Book

Here is a book that I made.

We made a book on poetry. First, we wrote our poems. Then, we figured out how to work book creator. Book creator is an app that lets you create books. It is a very important part of making this book. It has tools to let you record, draw, and write.

My favourite part of this project was my haiku. It went like this.

Nature is calming

You hear birdcall above

You see a cougar

The cougar pounces

Just in time, you roll away

No more birdcall now

You can trust nature

Birds sing when there is danger

Where is the cougar?

This was just a short post, but be ready for one on DI soon!

Laser Laws

Hey guys, welcome back or to my blog. In this project we made a laser display using the Pythagorean Theorem. The display had to include a triangle that was measured, how we proved the law of reflection, and how we proved the Pythagorean Theorem. We also did extra path that showed how accurate the measure app is. In my group I had Brooke, Jasper, and Andrew

At the start of this project we did a project start mind map. We listed questions we had about lasers and the Pythagorean Theorem. We put in thoughts, and we put in examples. As you can see, I didn’t know a lot about lasers, but I know a lot more after this project.
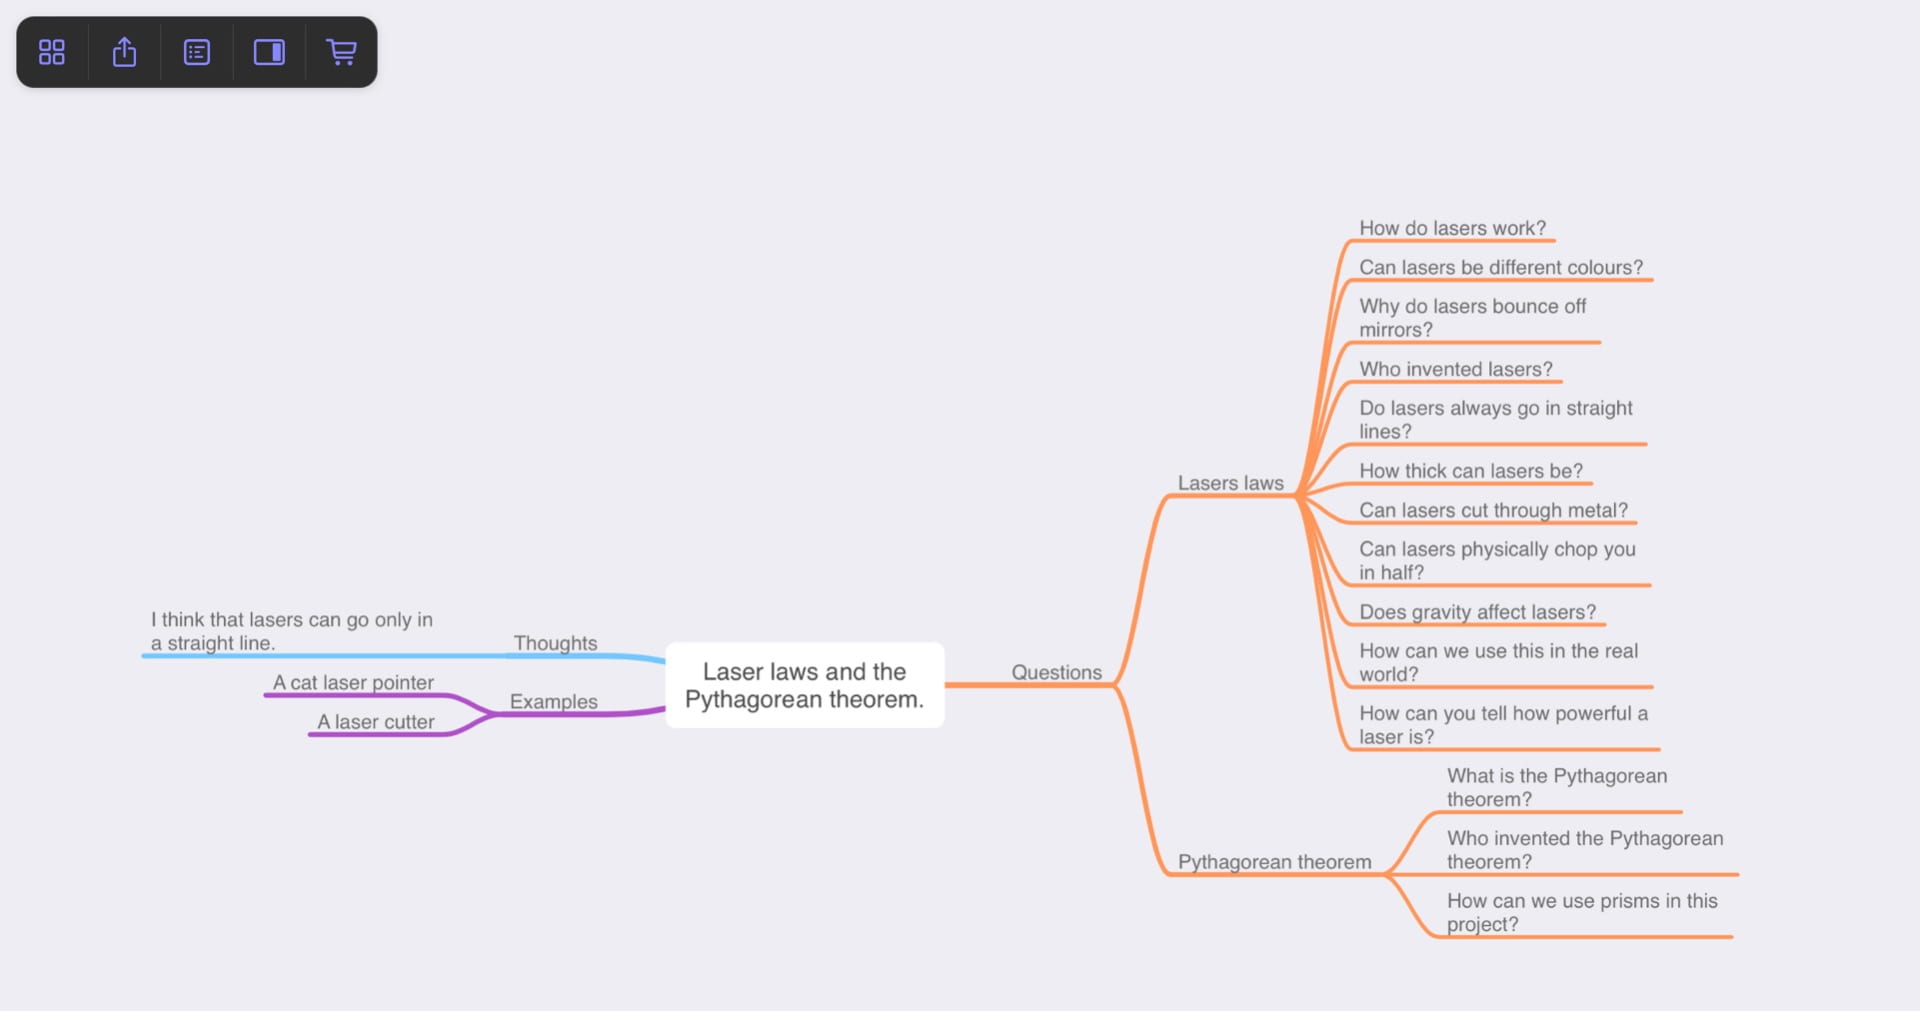
So there was the project start mind map, but there is also a project end mind map. What I do, is I go through and answer all of the questions that I had. This is what my mind map looked like after the project.

Milestones:

Milestone 1: Project start mind map, which is the first photo in this blog post.

Milestone 2: Law of reflection lab. In this milestone, we proved the law of reflection using a ray box. Here is my lab report. Lab Write-Up: Law of Reflection Experiment Purpose: Test the law of reflection to confirm it is true.
Question: How can we test the law of reflection to confirm that it is true, using a ray box, plane mirror, protractor, pencil and paper?
Hypothesis: Yes, I think that we can confirm the law of reflection using these materials.
Procedure:
• Plug in ray box
• Slide in the slitted square so that there is one slit showing
• Attach clips to plane mirror
• Set mirror up vertically on a table
• Place ray box on table, point at the mirror
• Put piece of paper under the mirror
• Trace the line of light with pencil
• Measure the angle with the protractor
• Record the measurements
• Repeat two more times using different angles by changing the angle of the light
Analyze Data:
1. Experiment #1: Angle of incidence = 50 Angle of reflection = 50
2. Experiment #1: Angle of incidence = 70 Angle of reflection = 70
3. Experiment #1: Angle of incidence = 10 Angle of reflection = 10
Conclusion: In this lab, we tested the law of reflection to see if it was true. First, we had to come up with a purpose, then turn that purpose into a question, then come up with a procedure, analyze data and finally, write this conclusion. We hit the ray box off of a mirror, and measured the angles, and it turned out that they were the same! So I concluded that the law of reflection is true. For an extra experiment I hit the light off of a concave mirror, and when the light came off of the mirror, it curved! From that I can prove that light sort of curves.

Milestone 4: No one did Milestone 3, so I’m gonna skip ahead to Milestone 4! We proved the law of reflection with a website. Here is my write up:

Milestone 4- Laser Triangle Lab

Question:

How can I test the Pythagorean theorem and the law of reflection?

Hypothesis:

I think that if I get the angles correct, I can make a right angle triangle.

Procedure:

  • Go to the website
  • Set up a single ray of light
  • Put a mirror in so that the light reflects off it
  • Put another mirror so that it looks like a right angle triangle
  • Adjust while measuring with a protractor so that it is a right angle triangle
  • Put rulers to measure
  • Take a screenshot
  • Use markup to measure the lengths
  • Finish this lab report and add the screenshot to this document
  • Hand in to Showbie  

Data/Results/Analysis:

I realized that it is extremely difficult to create a perfect right triangle. This is the closest that I got. My hypothesis was technically correct, but I couldn’t get the angles correct no matter how hard I tried. My two legs are 9.2cm squared, and 3.8cm squared. My Hypotenuse is 9.9cm squared. I do think that the law of reflection is true, but you need robot reflexes or have an actual robot to do the triangle correctly. To prove the law of reflection, I said that the angle of incidence = the law of reflection. This second photo really shows that. If you measure it with a protractor, the angle is the same, 40 degrees. We also proved the law of reflection in another lab that we did. Photos of that lab are on the last page.

Conclusion:

I can conclude that my hypothesis is correct, but it is very hard to get it exact. How can I test the Pythagorean theorem and the law of reflection? My answer to this question is you can with this app. This was a really cool experiment and I can’t wait for the final milestone.

Milestone 5: Milestone 5 was just a picture of our laser display. Here it is!

Last but not least, milestone six is this blog post!

Reflection on core competency:

Questioning and predicting: Looking back on all of the Milestones that we did in questioning and predicting, I think that I did well. We did the project start mind map, and I had tons of questions. I felt that I was interested about the chosen topic and the I was questioning a lot.

Communicating and representing: I think that I communicated very well. When I was sick, I FaceTimed my group to help work on our project!

Applying and innovating: I helped build a lot of our project. I came up with ideas and I think that our whole group should get extending on this last one. Everyone helped with this.

Thanks for reading! – Charlie


5 Best Things in Music!

Left to right: My sister, Me, my other sister.

Hey guys, and welcome back to my blog! We are on post number 4 of a five post series. In this post I’m going to focus on telling you the best things about music! Please check out my first, second, and third blog posts before reading this one.

I think that one of the best things in music is all of the complicated songs that you can eventually play. They make everyone happy around you, and they can make you happy, too! Another thing about music is that two different people that speak different languages can enjoy the same music, because music is a universal language. Music is also very cultural. The First Nations people of Canada enjoy their music too! I also love their music. Music can get you either pumped up or calmed down. If you’re going to a soccer game or something that requires a lot of energy, you could listen to more upbeat music. If you are going to bed or just reading a book or something, you could listen to chill music. Another thing is that you can play it when you are quite young. I have this video from a while ago of when I was playing piano. IMG_1509

Also, people can make AMAZING things with music. This is a video that my mom took of a self-playing piano. You hire a concert pianist to play from their home, and it shows up onto your piano! IMG_1511

Most people love music😍! Do you remember at 7:00 when people used to make some noise in honour of the front-line workers? On our street a bagpiper played, as well as my neighbour and I. My neighbour played ukulele, and I played trumpet. We played O Canada. Playing at 7:00 is something that I will remember for the rest of my life. That brings us to the end of my blog post. Thanks for reading!

Music posts part 3!

Hey guys, welcome back to another blog post! Today I’ll be taking a photo of something around me that represents music, which is my topic. If you haven’t already, be sure to check out my other blogs in this project here and here. Remember on the last post to vote!

What I chose to represent music is my work-space. Here it is.

In this photo you see where I play my main instrument, the piano. The two certificates are my piano awards, I have a timer to time my practices, and on the right is where I store all of my many, many books.

7 facts about music!

This is my second post in a five post series about music. My first post you can see here. In this post I will be talking about seven amazing musical facts. They will be about instruments, my music, and some songs. 

I’ll start off with something that a lot of people probably already know. Did you know the Mozart wrote his first symphony when he was nine?!?!? My second fact is that the most common instrument that people start off with is the keyboard/piano, which I was somewhat surprised about. I thought that it would be vocals. So fact number three is about one of Beethoven’s best songs that most people don’t know the name of, Fur Elise. Beethoven wrote it when he was half deaf!

My fourth isn’t really a fact. I have a poll! Click here to vote on your favourite type of music! Numero fivo. Most music comes from Russia, which I found really surprising. Second last fact! 85% of kids either play or have played an instrument in their lifetime. And my last fact is actually helpful. Music can help some people concentrate! Use chill music without words for writing, like I’m listening to as I’m writing this post (I made this playlist!), and you can use more upbeat music with words for math and science. Thank you for reading this post, and be sure to tune in for the next one!

P.S. be sure to check out all the links!

Music: A Way Of Life

Music is a great way to either calm down, or get excited! At bedtime, you could listen to more chill songs, and when you’re about to start a sport or something, you can listen to exciting music to get you hyped up. No matter how you use or play music, it is a great way to connect with people around you, and is an easy way to do something that you love. Maybe you love listening to music, maybe you love playing it. No matter what, I think that music is a great thing. 

Over the next few weeks, I’ll be writing 5 blog posts about music. They will be short, and all about music. I play the piano, so I’ll mostly be talking about my experience with it, but I will also talk about other instruments. 

Outsiders – a book of worldview

Hey everyone, and welcome back to another blog post in my blog! In this project we did two tableaus. They were about a book called the Outsiders. The Outsiders is a novel by S.E. Hinton, which she wrote in the 1960s. This is a traditional grade 8 book, so old that my parents read it in grade eight! For this project, my group members were Chris, Sydney, Seth, Keenan, and Cameron.

First, we learned about the novel. It was based around two gangs, the Greasers, and the Socs. The Greasers are the gang that the main character, Ponyboy is in, while the Socs are the upper, richer, class. My favourite part of this book was Johnny’s quote, “Star gold Ponyboy, stay gold.” 

Second, we learned about worldview. Worldview has seven different aspects. There is geography, time, beliefs, society, values, economy, and knowledge. When we presented this, we had a script explaining how our chosen aspects of worldview relate to our scene that we presented. “We chose this scene to represent two aspects of worldview, geography and economy. If Darry wasn’t stressed about his financial situation he might not have slapped Ponyboy. We also chose geography because they live in a really rough neighbourhood causing them to turn into greasers.” We then transposed this scene into 2021, “we have kept the same aspects for this scene as the first, which can be seen here as geography and economy. Geography is represented by where they live, and economy is represented by the older phone models.” 

Last but not least, we learned about Tableaus (I think that’s how you spell it). A Tableau is a still image. A Tableau must include these elements. Different levels (high, medium, low), different body shapes (open or closed), effective use of physical space (balance + visibility), strong poses that communicate a story,  strong facial expressions that convey emotion, focus is appropriate and in character.

We presented all of our elements of learning by choosing a scene, representing that scene as a Tableau, and choose two worldview elements to go with our scene. The scene that we
got was in the Curtis’s living room, when Darry slapped Ponyboy. Everyone had different roles in this Tableau. Sydney was a bush, Cameron was Darry, Christian and Keenan were walls of a house, Seth was Sodapop, and I was Ponyboy. Here is us setting up:

“What can the Outsiders teach us about worldview” was the driving question for this post. I think that the Outsiders can teach us a lot about worldview. They live in a rough neighbourhood as the lower class, the Greasers. This novel could happen in our world today, but not here. Maybe in some of the bigger cities where there are more gangs. But I don’t think that it could happen here (also because guns are banned in Canada). Also, I think that the cigarettes would be replaced with vapes. 

Thank you for reading, and there will be more posts soon. Also, be sure to check out my YouTube channel. I have three videos so far: 1, 2, 3.

Constructing Creative Communication – Herzog

This was part two of our Maker project, Constructing Creative Communication! In the last couple of weeks, I was focused on taking photos like Herzog. Herzog was born in Germany in 1930, but immigrated to Vancouver in 1953. His specialty was colour photos and street photography. Here you can see more of Fred Herzog’s photos here. 

The first goal was composing composition. To build on this skill, we learned how to adjust focus and exposure, consider the rule of thirds, backgrounds and foregrounds. The assignment for this goal was to hand in a photo from one of the activities that we did. The activities were photo walk, photograph something familiar, and create a personified picture. I chose to hand in one of the photos that I took on my photo walk. 

Our second goal was called adjusting angles. We learned how to use photo booth and the timer, experiment with basic camera angles, use preset filters in the camera and photos app, and play with lighting. I learned that there are 4 basic camera angles. The birds eye, worms eye, close up, and the long shot. The birds eye is from above at a subject below. The worms eye is below to above, the close up is, well, close up, and the long shot is from far away. We had to shoot self portraits, make a portrait, and create a silhouette portrait. Our assignment was to choose a photo of us when we were younger, then use our skills to take that same photo now! 

Goal number three was manufacturing mood. We moved on to advanced camera angles (eye level, high level, extreme close up, extreme long shot, medium shot, and canted perspective), we tried panorama, we used scale and contrast, and we learned to apply filters on some apps that we have, Pixelmator photo, and Snapseed. Our assignment was to make a photo of a word that we chose out of a hat. My word was dignified and this was my photo. 

Skill four was creating collages. We learned how to use basic keynote with photos, yes advanced keynote with photos, and create storyboards with our images. First, we had to pictorialize our name, then we had to create a personalized collage. Also, we built an about me page here.

Skill 5 was molding movement. We made a Gif! I made two. The first one was a one that I made for fun, and the second one was the one that I handed in. They were supposed to be about a mood, and I chose annoyance for the second one.

This was a lot of fun. I really enjoyed taking photos, and I enjoyed both parts of this project. Now, the big question. “How might I use technology to create and communicate?” Well, being in Herzog and Carr has affected how I think about things. Before when I was taking a photo, I might want the target in the middle, but now I know that its more effective for them or it to be in a third. 

I learned how to Construct Creative Communication in Carr.

In this Maker project, we have split into two groups, Herzog and Carr. For the first half I was in Carr. In Carr we focused on drawing. Emily Carr was a famous artist from 1871 to 1945. She was most well known for her landscape artworks. In these couple of weeks we will be learning how to incorporate pressure, doodling, shading, perspective, and using colour into our drawings.

The first goal was using pressure. In this goal we started to learn what different brushes in the tool bar do, we learned how to use various pen and brush styles and sizes, we learned how to change the pressure from our Apple Pencil to make lines thicker, thinner, darker, or lighter, and we learned how to create patterns from lines. The app that we used was Sketches Pro, and you can check that out here. After we had learned all of those things, we had to make our name using the things that we learned. This is what I did.

  • This slideshow is my progression when I made my name.

The second goal was doodling. This was mostly using 2D shapes to show what we have learned. We made an emoji to practice our shapes, and then we got right into it. Our assignment for doodling was sketchnoting something. It could be our life, a video, or anything else. We needed to use lines and arrows, containers, organization, and text in our sketchnotes. For my sketchnote I did a Mark Rober video.

  • These are my sketchnotes for the video.

Our third goal was shading. This time, instead of drawing 2D, we learned how to draw 3D shapes. One of the most important things in shading is understanding light and shadow, and we learned how to do that too. For this activity, we had to create a value scale, which is something which has the darkest colour at the left, and the lightest (white) at the right. Here is my value scale.

Then, we built a robot out of 3D shapes! We learned that it is very important to break objects down into shapes, if you want to draw them. For example, this guitar could be broken down into these 3D shapes.

Guitar:

Robot:

Perspective was our fourth goal. To build this skill, we were to find the horizon line, find the vanishing point, understand linear perspective, add depth through perspective, and use the smudge tool to add depth. We used layers to help us create a landscape photo. I chose the Sydney Opera house.

Just like that, we were onto our last skill! We were learning how to use colours to show emotion. We also got to Zoom with Chloe Devine! We had to create a logo of a random business that we knew or wanted to start.

Why are we learning this is a common question in PLP projects. We are learning this because this actually helps with one of our core competencies. The adult world connection is also a big part of all PLP projects. Some of us will have jobs where we must use either photography (Herzog) or drawing (Carr). But this project is more about understanding the skills that we develop. The driving question for Constructing Creative Communication which I’ll answer in the final blog post for this project is “How might I use technology to create and communicate?”

Our first Scimatics project!

How are thematic and mathematical elements used in game design was the driving question for this post. In this project, we used probability and tectonic plates to make a board game. Our game represented probability very well, because it included cards, and a dice. For this project, my group member was Silas.

This is my project start/end MindNode. At the start of this project, we put down our game ideas, examples of tectonic plates, our thoughts on tectonic plates, and some questions  that we have about tectonic plates. In game ideas, my group thought that it would be cool if the person playing was the disaster, because we thought that everyone was going to do something about escaping the natural disaster (we were right).

My questions and answers were:

  1. How many tectonic plates are there? 17. Pacific Plate, North American Plate, Eurasian Plate, African Plate, Antarctic Plate, Indo-Australian Plate, South American Plate, Somali Plate, Nazca Plate, Philippine Sea Plate, Arabian Plate, Caribbean Plate, Cocos Plate, Caroline Plate, Scotia Plate, Burma Plate, and the New Hebrides Plate.
  2. Where do volcanoes form? Volcanoes form at convergent plate boundary’s. The crust in the ocean sinks below the crust on land, and in the mantle, the water in the oceanic crust seeps out and forms magma. Then when the pressure from the magma builds up, the magma (now lava) spurts out of a mountain.
  3. Which natural disasters to tectonic plates cause? They cause mostly volcanoes, earthquakes, and tsunamis.
  4. Are there tectonic plates on other planets? No. It is one of the many things that sets earth apart from other planets.
  5. Do tectonic plates cause floods? Tectonic plates cause tsunamis, which can cause floods, but they don’t effect rainfall directly.

In the examples category, I put a tectonic plate could be the North American plate. The North American plate, the one that Vancouver in on, is the second biggest tectonic plate, the biggest being the Pacific plate. For thoughts, I put that I think that tectonic plates are always moving (they are moving around 7 centimetres a year!), I think that tectonic plates cause most disasters, and I don’t think that they cause floods.

Our game was easier to understand once we got going, and it was very fun. These are the rules:

Humans vs. Aliens Rules:

Aliens from the planet ƒåüç†ø∂é¡ have come to earth and forged themselves into tectonic plates with the goal of killing all humans. The UNSOC (United Nations Space Operating Committee) is tasked with protecting earth. Who will win in the ultimate battle between Humans and Aliens?

Two or four players only.


Set up: 

  1. Choose roles (alien or human) Aliens are attackers and humans are defenders.
  2. Shuffle both decks of cards.
  3. Deal each player three of their own team’s cards
  4. Place one population token onto each of the capture points.
  5. Place ten of each disaster tokens as well as the twenty four mountain tokens on the

How to play:

  1. The attacker(s) go(es) first. They can spawn whatever card they want that is in their hand.
  2. They roll the die based on what it says on the card that they decide to play.
  3. If they succeed in creating the disaster then they place a token of the thing they created on the point and wait until the next turn. 
  4. Repeat for the rest of the cards they wish to play.
  5. They then collect their cards biased on the number they roll.
  6. The defender(s) goes next. They play any cards in the same manor of the attacker to try to defend the people.
  7. After that turn the defender(s) collect(s) their card(s).
  8. At the end of both turns the attacker(s) collect all of the kill points they achieved. The defender(s) collects all of the disaster tokens they diverted.
  9. This is repeated until one of the teams wins.

Winning the Game:

The attacker(s) must collect all 24 of the people tokens.

The defenders(s) must collect all 20 disaster tokens for them to win.

Important Notes:

  • You may choose to not play any cards during your turn 
  • You may not show anybody your cards, even your teammate
  • You may not tell anybody what you are planning to play, even your teammate
  • Cards  are added to a discard pile after they are played.
  • When there are no more cards in the deck you may shuffle the discard pile and continue playing.

Disaster Cards:

  • Consists of earthquakes and volcanoes.
  • Do not take effect until the round after the round in which they are played.
  • The power of the disaster is represented by power points. 1 power point destroys 1 population point
  • The disaster can stay on the board for 2 rounds and the same amount of power points can be reused on the second turn if there are still people there.


Mountain: 

  • Mountains are placed on the capture point connection lines.
  • They block any population point from evacuating along that line until destroyed.
  • Multiple mountains can be placed on one line.

Evacuation

  • You may evacuate anywhere that is not blocked by a mountain.
  • You may pass through a capture point that has a disaster but if you end on  one you will die.
  • You may split your number of evacuations between two population points.


Stopping a Disaster:

  • When a disaster has remained on the board for over 2 rounds without destroying population points it is given to the defender(s).
  • If a disaster remains on the board for over 2 rounds even after it destroys people points it is given back to the attacker(s).


Probability:

Probability to pick up a volcano, a mountain, and an earthquake.

1/3 x 1/3 x 1/3 = 1/9 x 1/4 = 1/36 2.8%

Get a full powered disaster.

1/4 = 25%

Get three full powered attacks or defences in a row.

1/4 x 1/4 x 1/4 = 1.6%

We were supposed to do 3 probability events, and those are the things that you see above. This next thing is a slideshow that I made to show our game board.

  • This is the game board.
  • These are some of the attackers cards.

In this project I learned how to communicate better. We had to communicate with our team to think up ideas. Communicating is important because in the real world, you have to communicate to your boss if you want a raise, or many more things. Thinking is another core competency. Thinking is important in the real world because without thinking, you couldn’t do any job!

How are thematic and mathematical elements used in game design? Thematic elements are very important in game design, because if you didn’t have a theme, your game would be very boring. For example, the theme of all of our games were tectonic plates. What I found interesting was how many different ways different people interpreted it. Mathematical elements are also very important because without probability, a game would have no way to take chances, so it wouldn’t be fun.